Status Pages
Public-facing status pages to communicate system health and incidentsEdit
Create public status pages to communicate system health, incidents, and scheduled maintenance to your users.
Status pages are hosted on unique subdomains and are publicly accessible without authentication.
Public Status Page
Once published, your status page displays real-time system health to users:
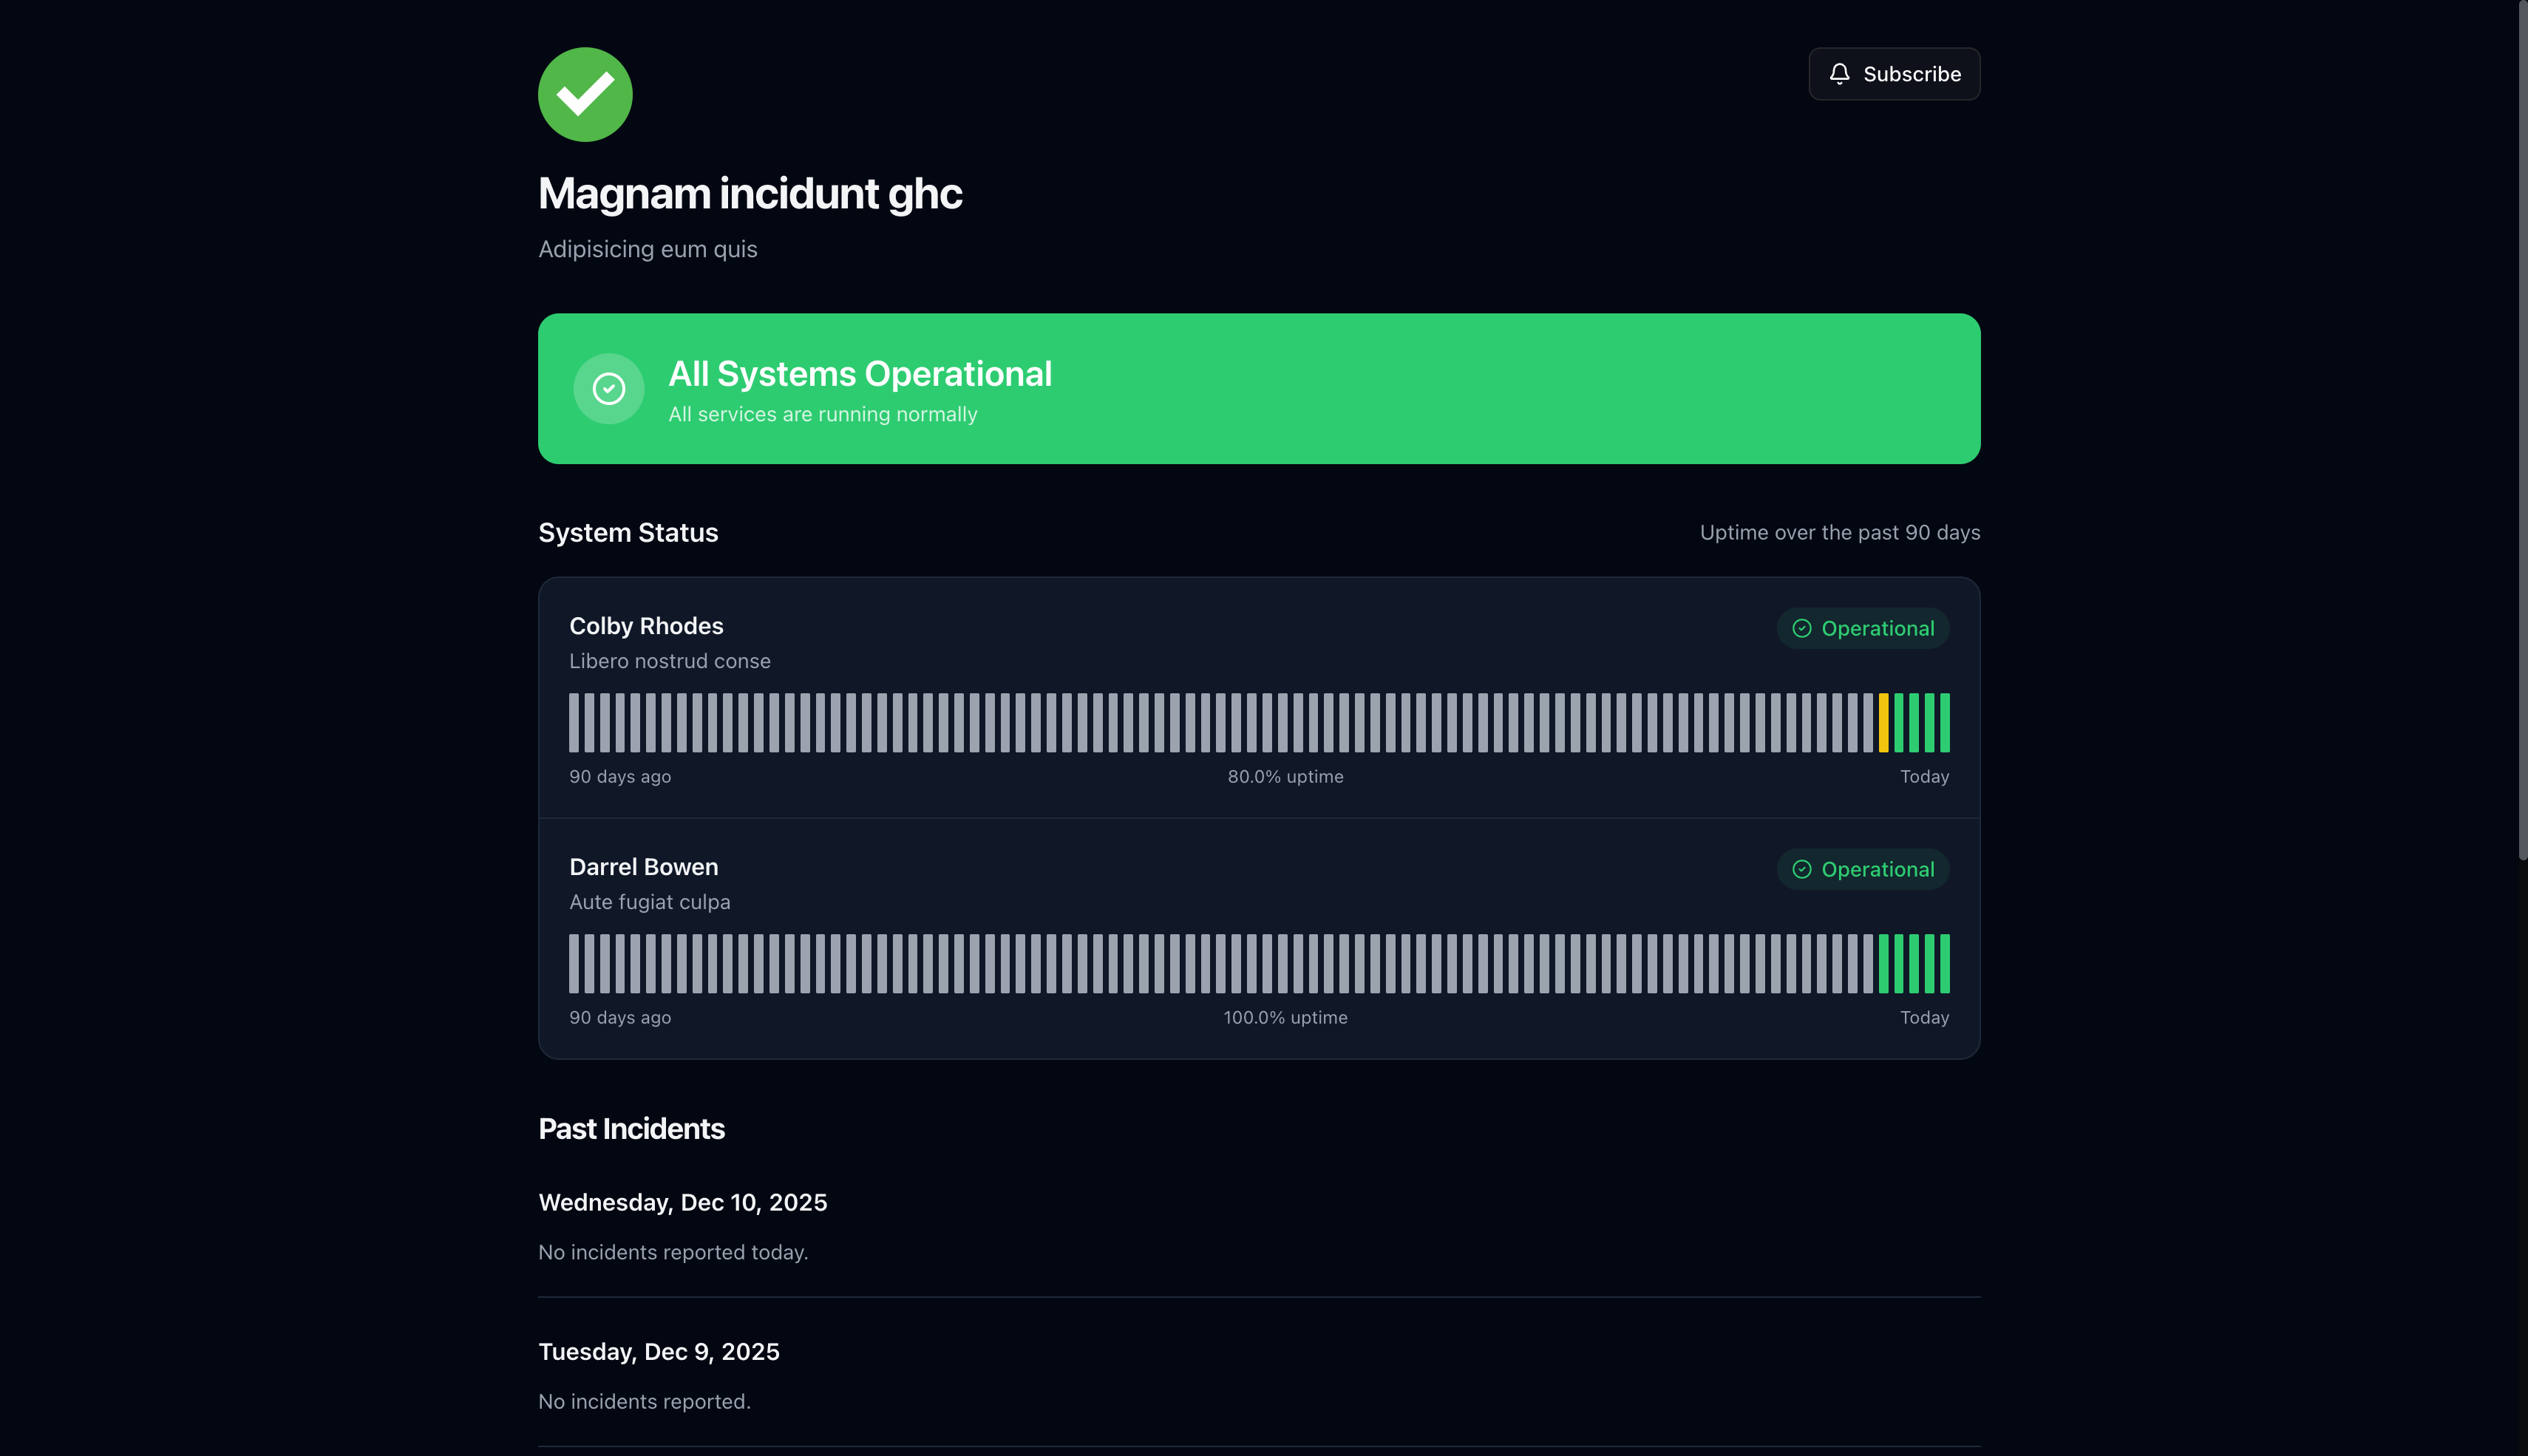
What users see:
- Status Banner — Overall system health (All Systems Operational, Partial Outage, etc.)
- Components — Individual services with current status and 90-day uptime chart
- Past Incidents — Recent incident history grouped by date
- Subscribe Button — Subscribe to receive incident notifications
Status Badges
Embed dynamic status badges on external websites, READMEs, or documentation to show real-time system health.
Badge URL Format:
https://yourdomain.com/api/status-pages/[status-page-id]/badgeQuery Parameters:
style— Badge style:flat(default) orflat-squarelabel— Left-side text (default: "status", max 64 characters)
Embedding in Markdown:


Embedding in HTML:
<img src="https://yourdomain.com/api/status-pages/YOUR_PAGE_ID/badge" alt="System Status" />Status Colors:
| Status | Color | Default |
|---|---|---|
| Operational | Green | #2ecc71 |
| Degraded | Yellow | #f1c40f |
| Partial Outage | Orange | #e67e22 |
| Major Outage | Red | #e74c3c |
| Maintenance | Blue | #3498db |
Colors are customizable via the status page Settings tab under Status Colors.
The badge is a public endpoint — no authentication required. It includes CORS headers for cross-origin embedding on any website.
Badges refresh every 5 minutes (server-side cache). For real-time updates, link directly to your status page.
Testing Your Badge:
Open your browser and visit the badge URL directly to preview the SVG output. Try different combinations:
| URL | Result |
|---|---|
/api/status-pages/ID/badge | Default flat badge with "status" label |
/api/status-pages/ID/badge?style=flat-square | Square-cornered badge |
/api/status-pages/ID/badge?label=API | Custom "API" label on the left |
/api/status-pages/ID/badge?label=Uptime&style=flat-square | Combined: custom label with square style |
Replace ID with your status page ID from the manage page URL or API response. If the badge shows invalid id, the path parameter is not the status page UUID.
iCal Calendar Feed
Subscribe to status page incidents in any calendar application (Google Calendar, Apple Calendar, Outlook).
Feed URL:
https://yourdomain.com/api/status-pages/[status-page-id]/icalSubscribing:
- Copy the iCal feed URL for your status page
- In your calendar app, add a new calendar subscription
- Paste the URL and subscribe
The feed includes the last 50 incidents with impact level, status, affected services, and links to incident details.
The iCal feed uses the same toggle as the RSS feed. Enable RSS Feed in your status page settings to activate both feeds.
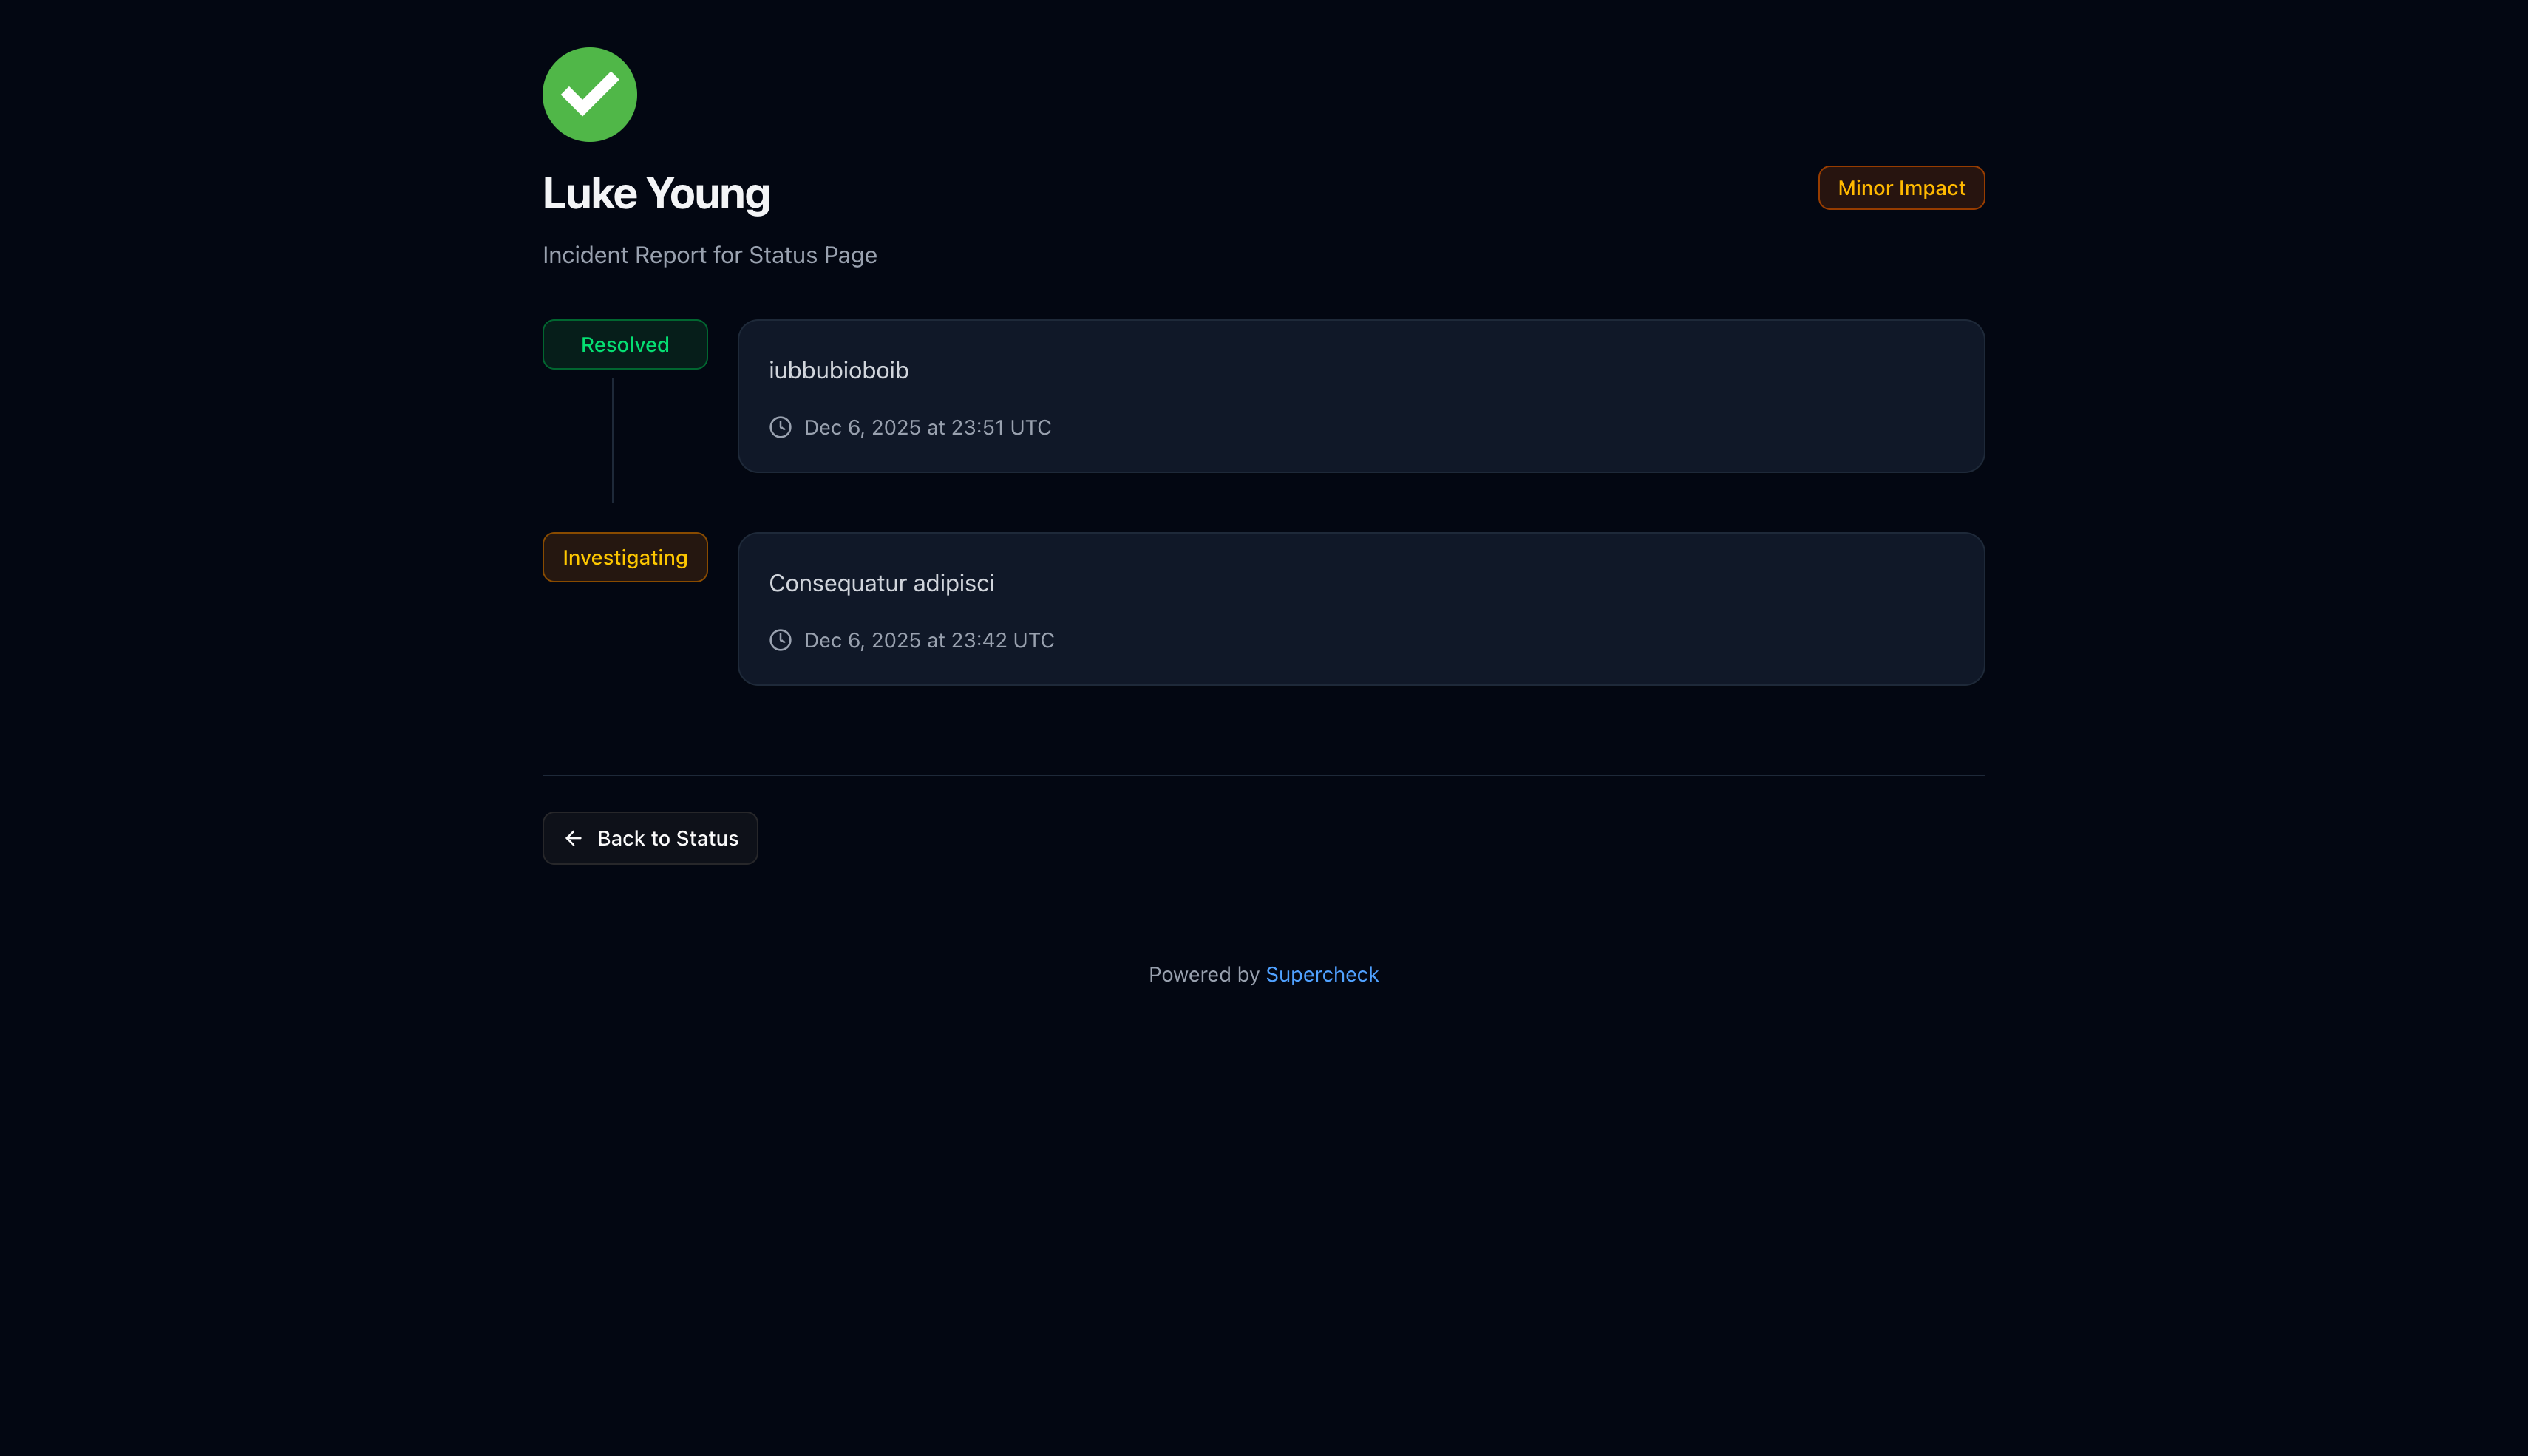
Incident Details
Users can click any incident to view the full timeline of updates:
Subscribing to Updates
Users can subscribe to receive notifications when incidents are created, updated, or resolved.
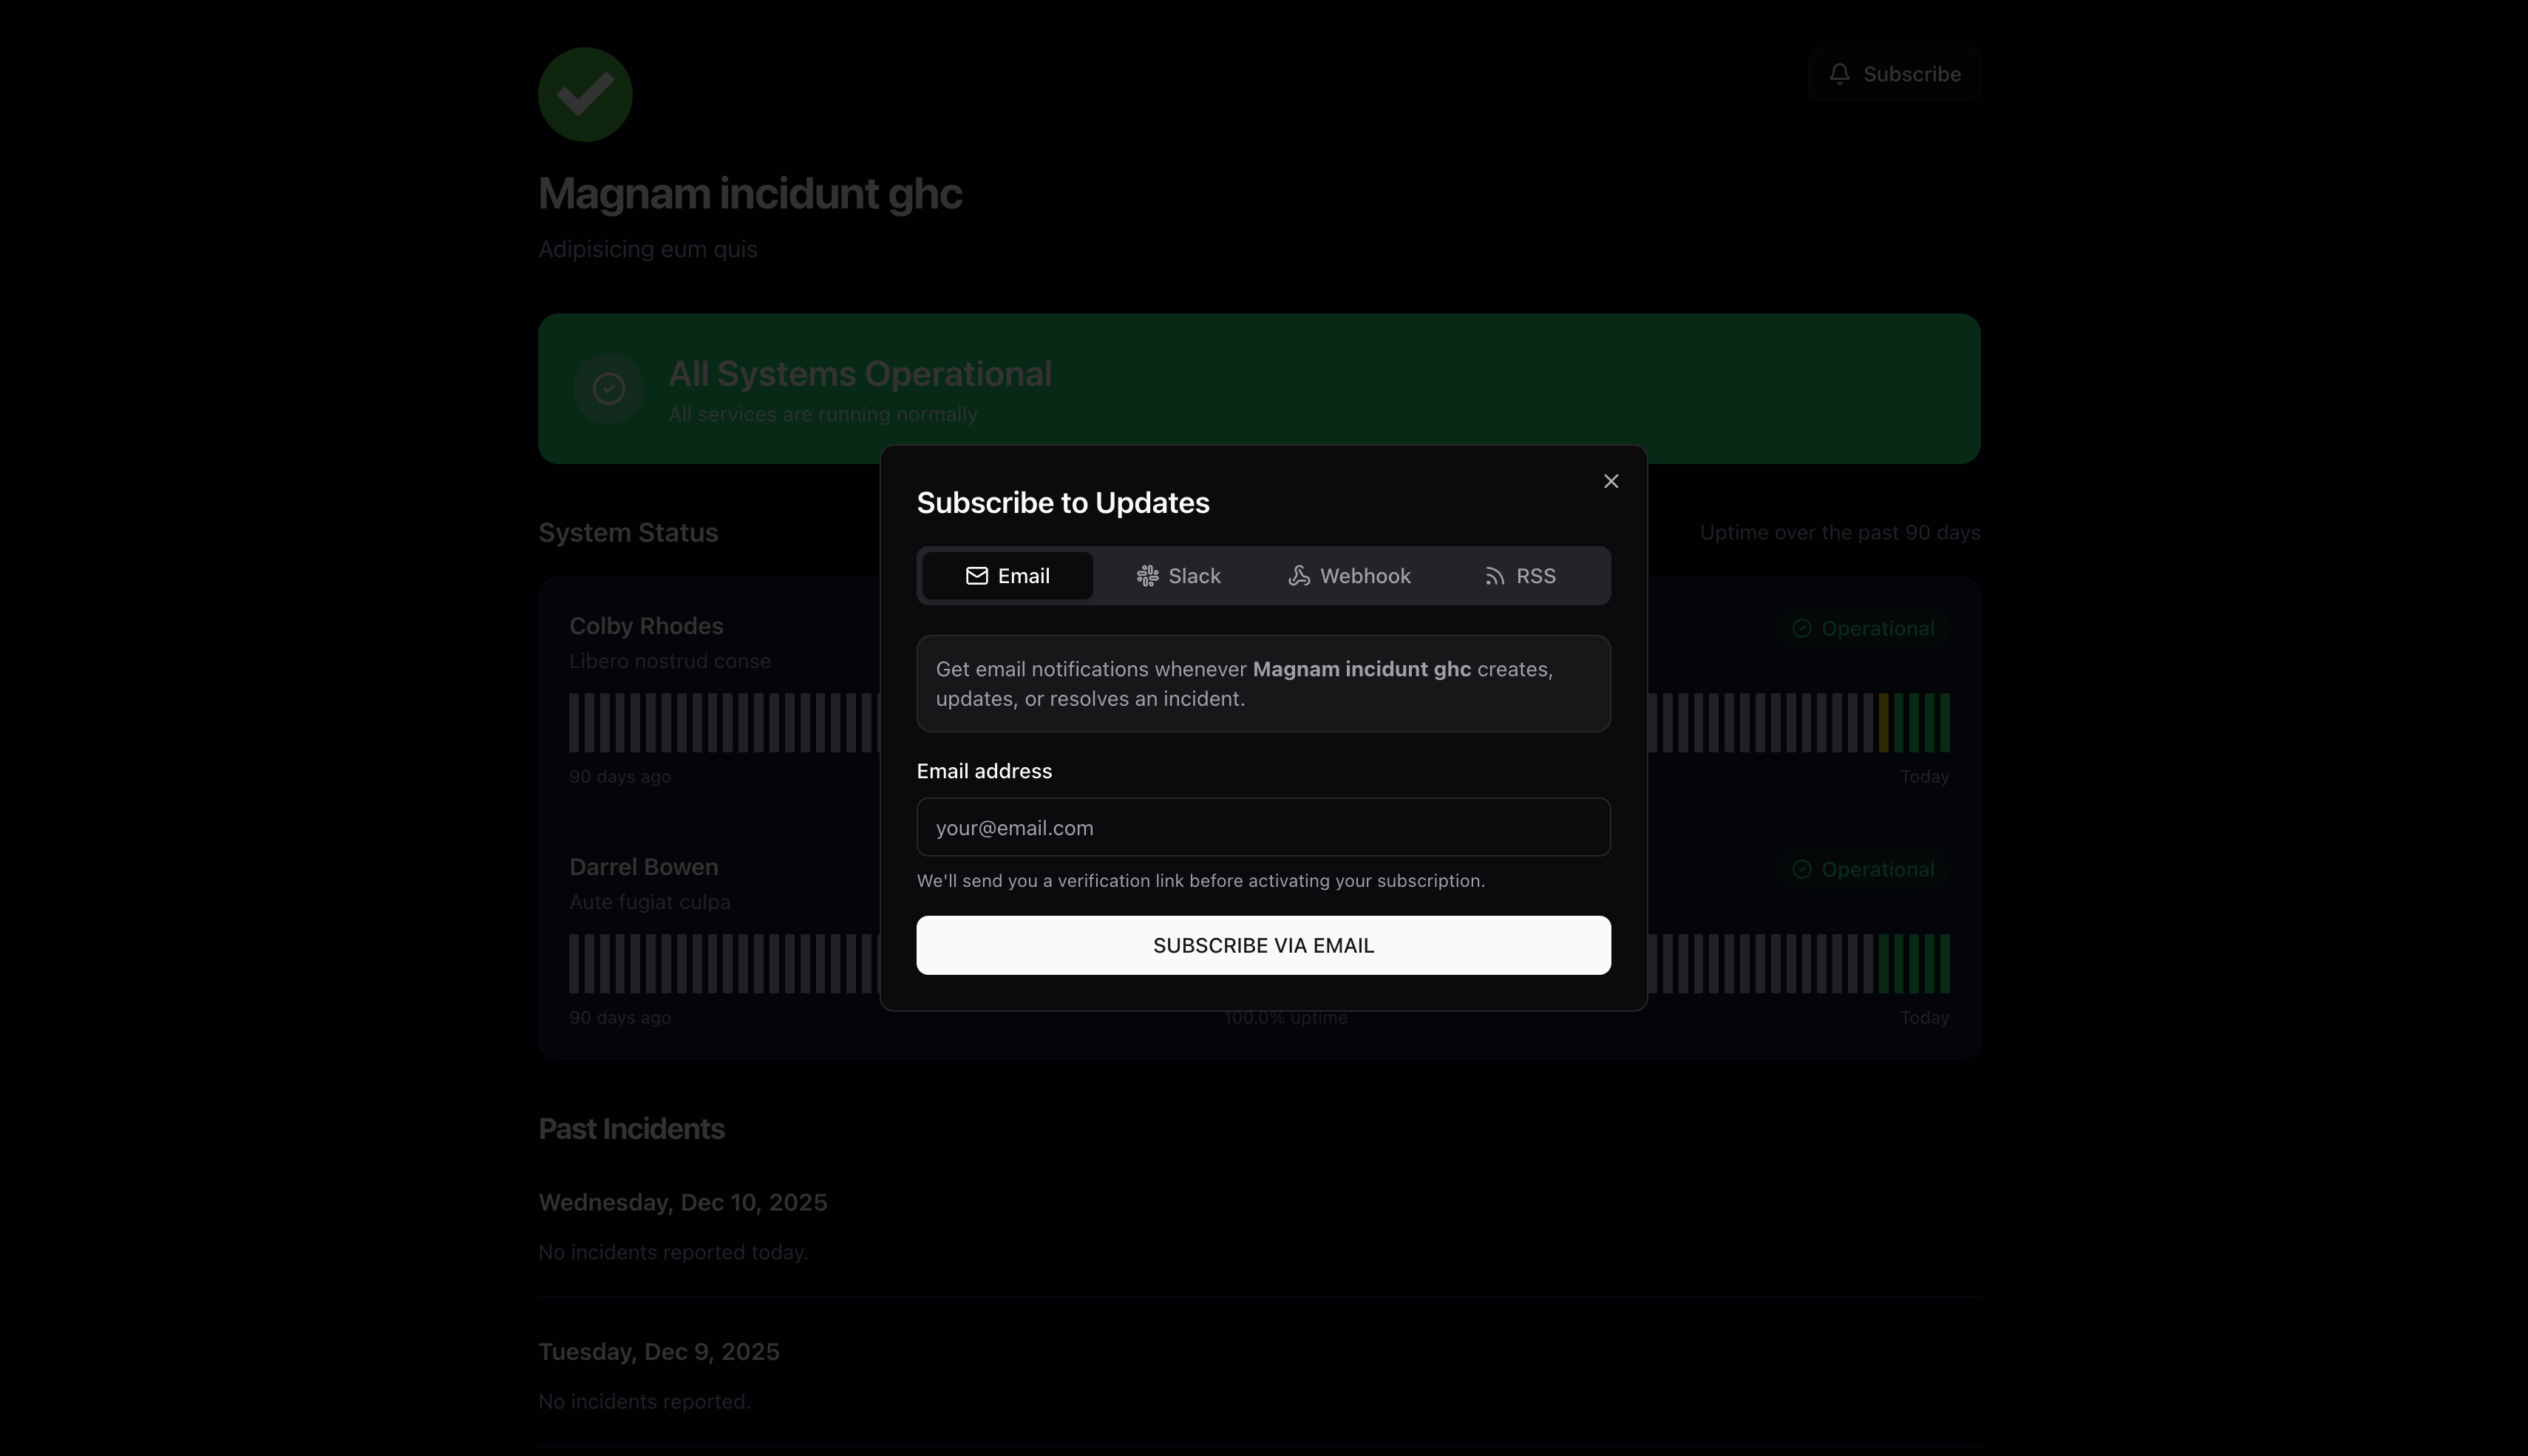
- Click Subscribe on the status page
- Enter email address
- Click Subscribe via Email
- Check inbox for verification email
- Click verification link to activate subscription

Send incident notifications directly to a Slack channel:
- Create a Slack app at api.slack.com/apps
- Enable Incoming Webhooks
- Add webhook to your workspace and select channel
- Copy the webhook URL
- Paste URL in the subscription dialog
Slack notifications include:
- Rich formatted messages
- Color-coded by incident impact
- Affected services and status updates
- Direct link to status page
For custom integrations, subscribe via webhook:
- Select Webhook tab
- Enter your webhook endpoint URL
- Receive JSON payloads for all incident events
Subscribe via RSS for feed readers and monitoring tools.
Subscribe via iCal to receive incidents in your calendar application.
- Copy the iCal URL:
https://yourdomain.com/api/status-pages/[id]/ical - Add a new calendar subscription in your app
- Paste the URL and subscribe
Supports Google Calendar, Apple Calendar, Outlook, and any app that accepts .ics feeds.
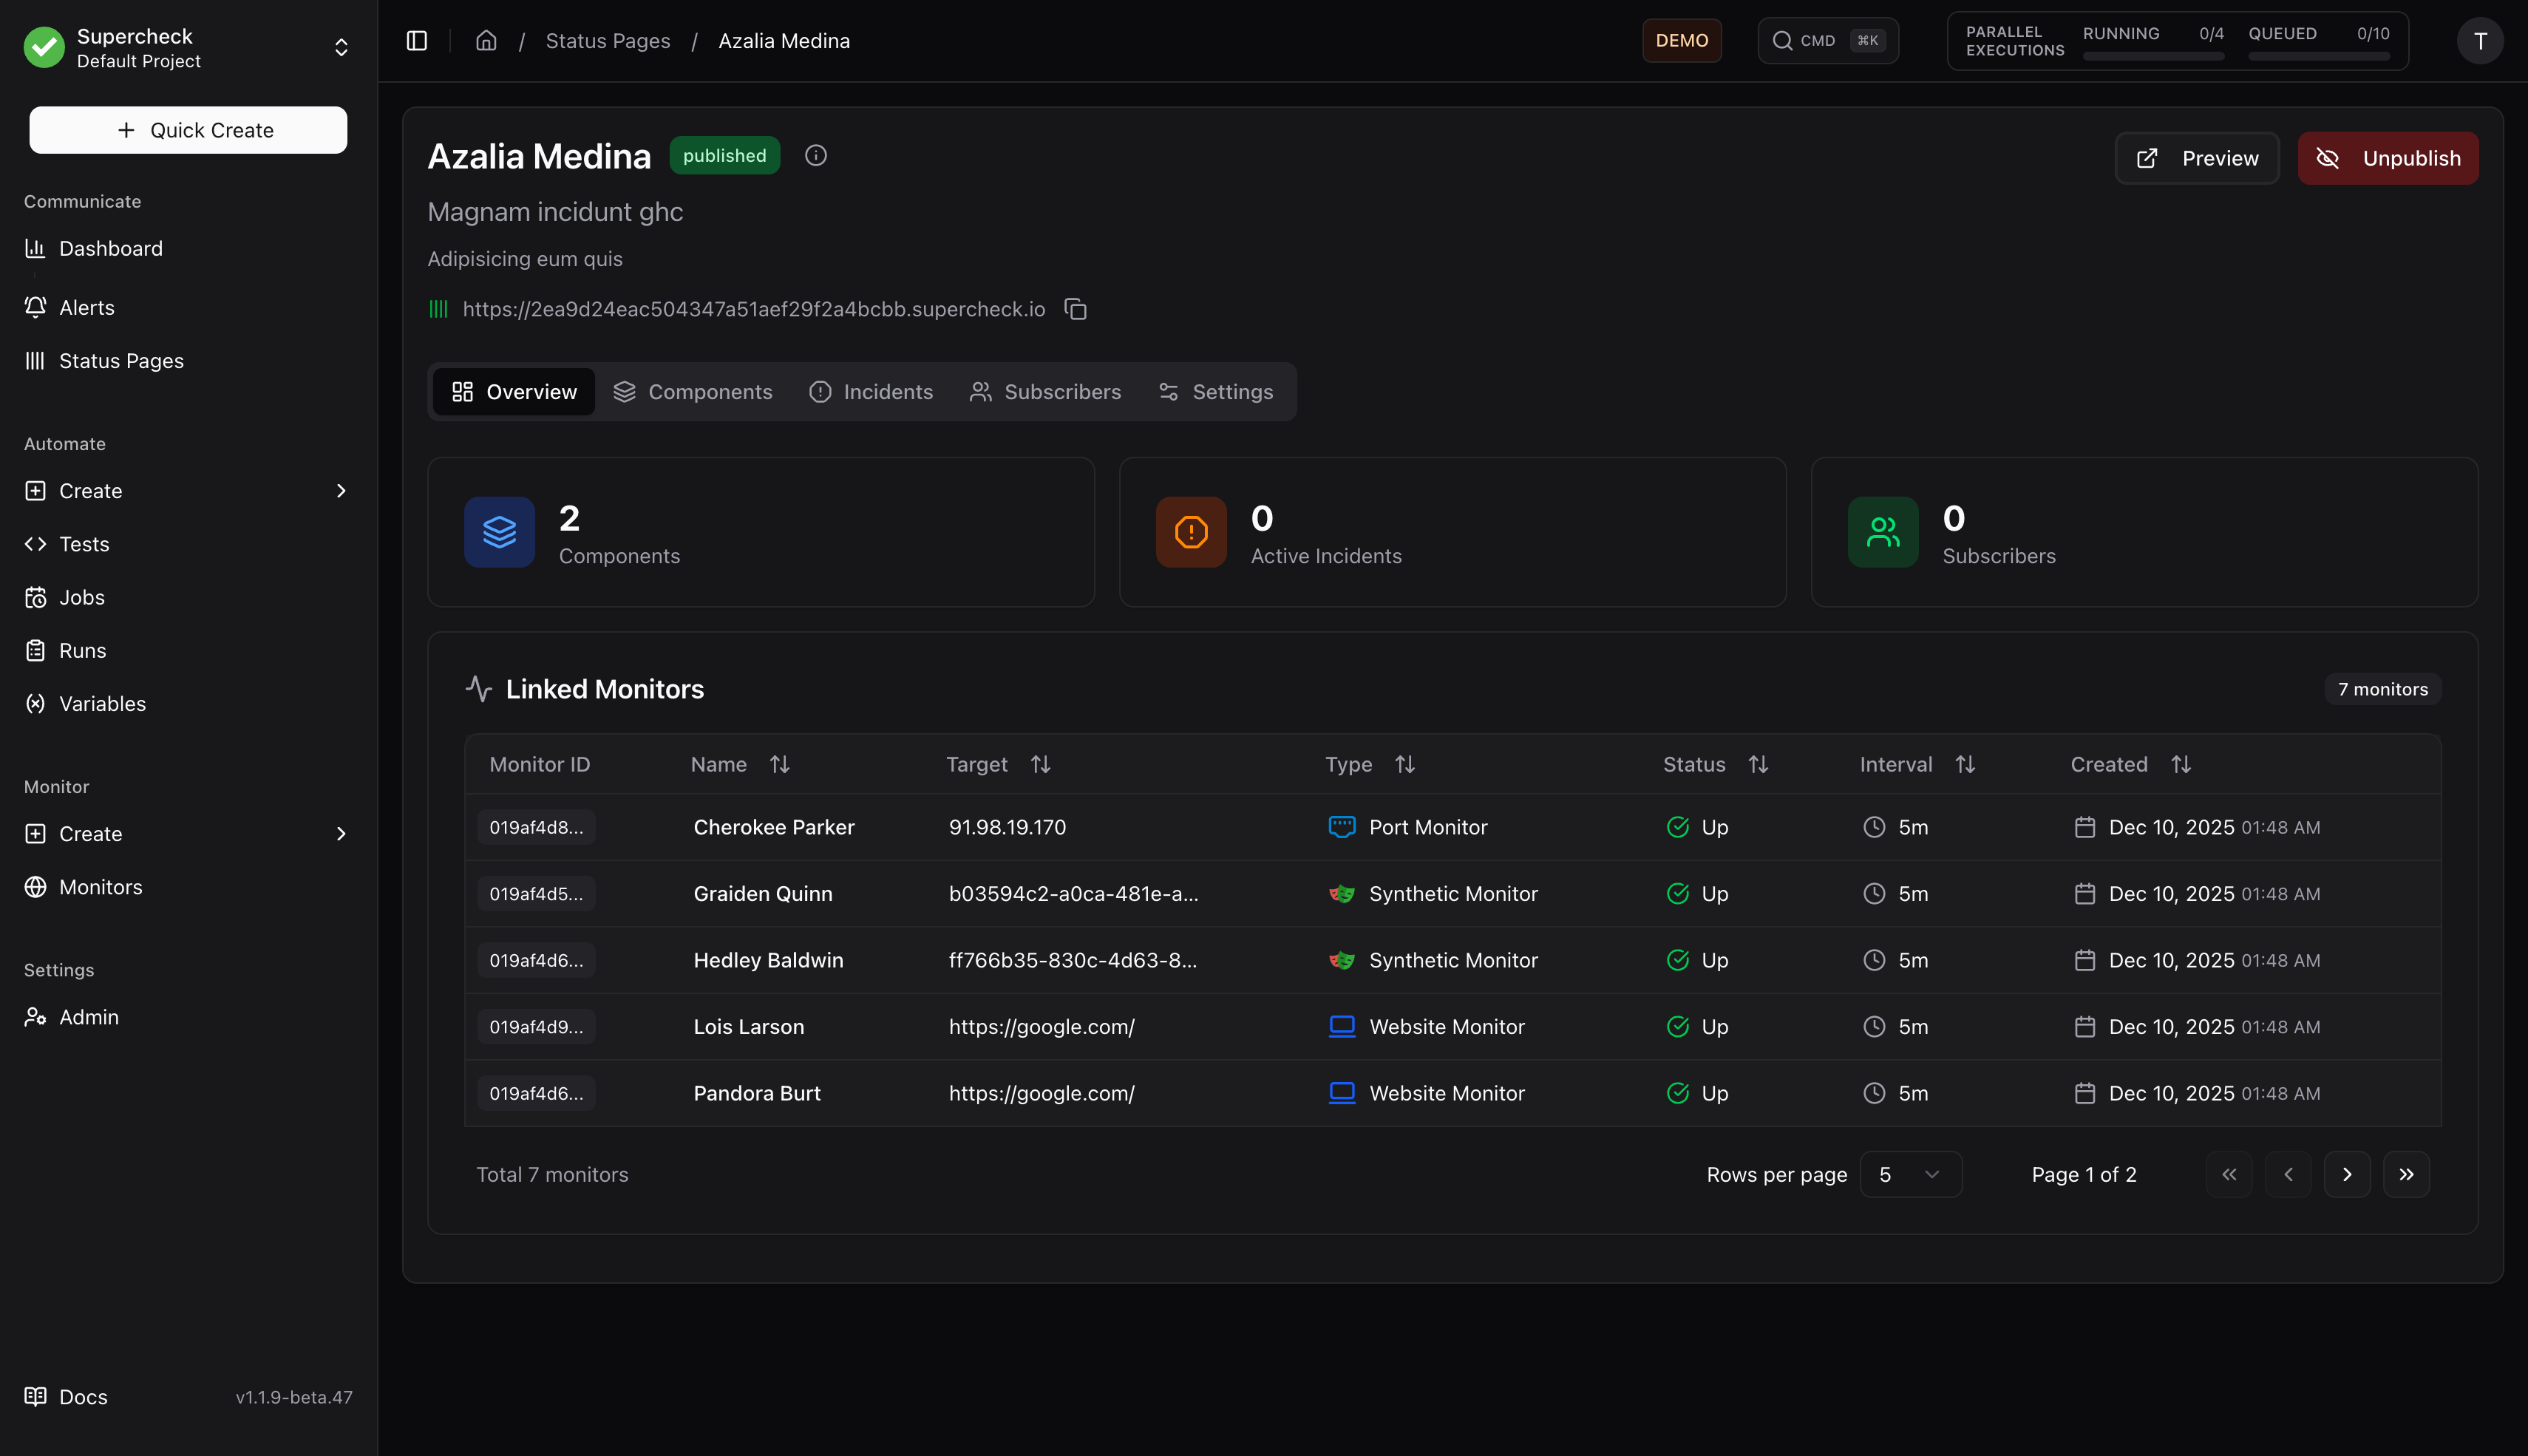
Managing Status Pages
Navigate to Communicate → Status Pages to view all your status pages.
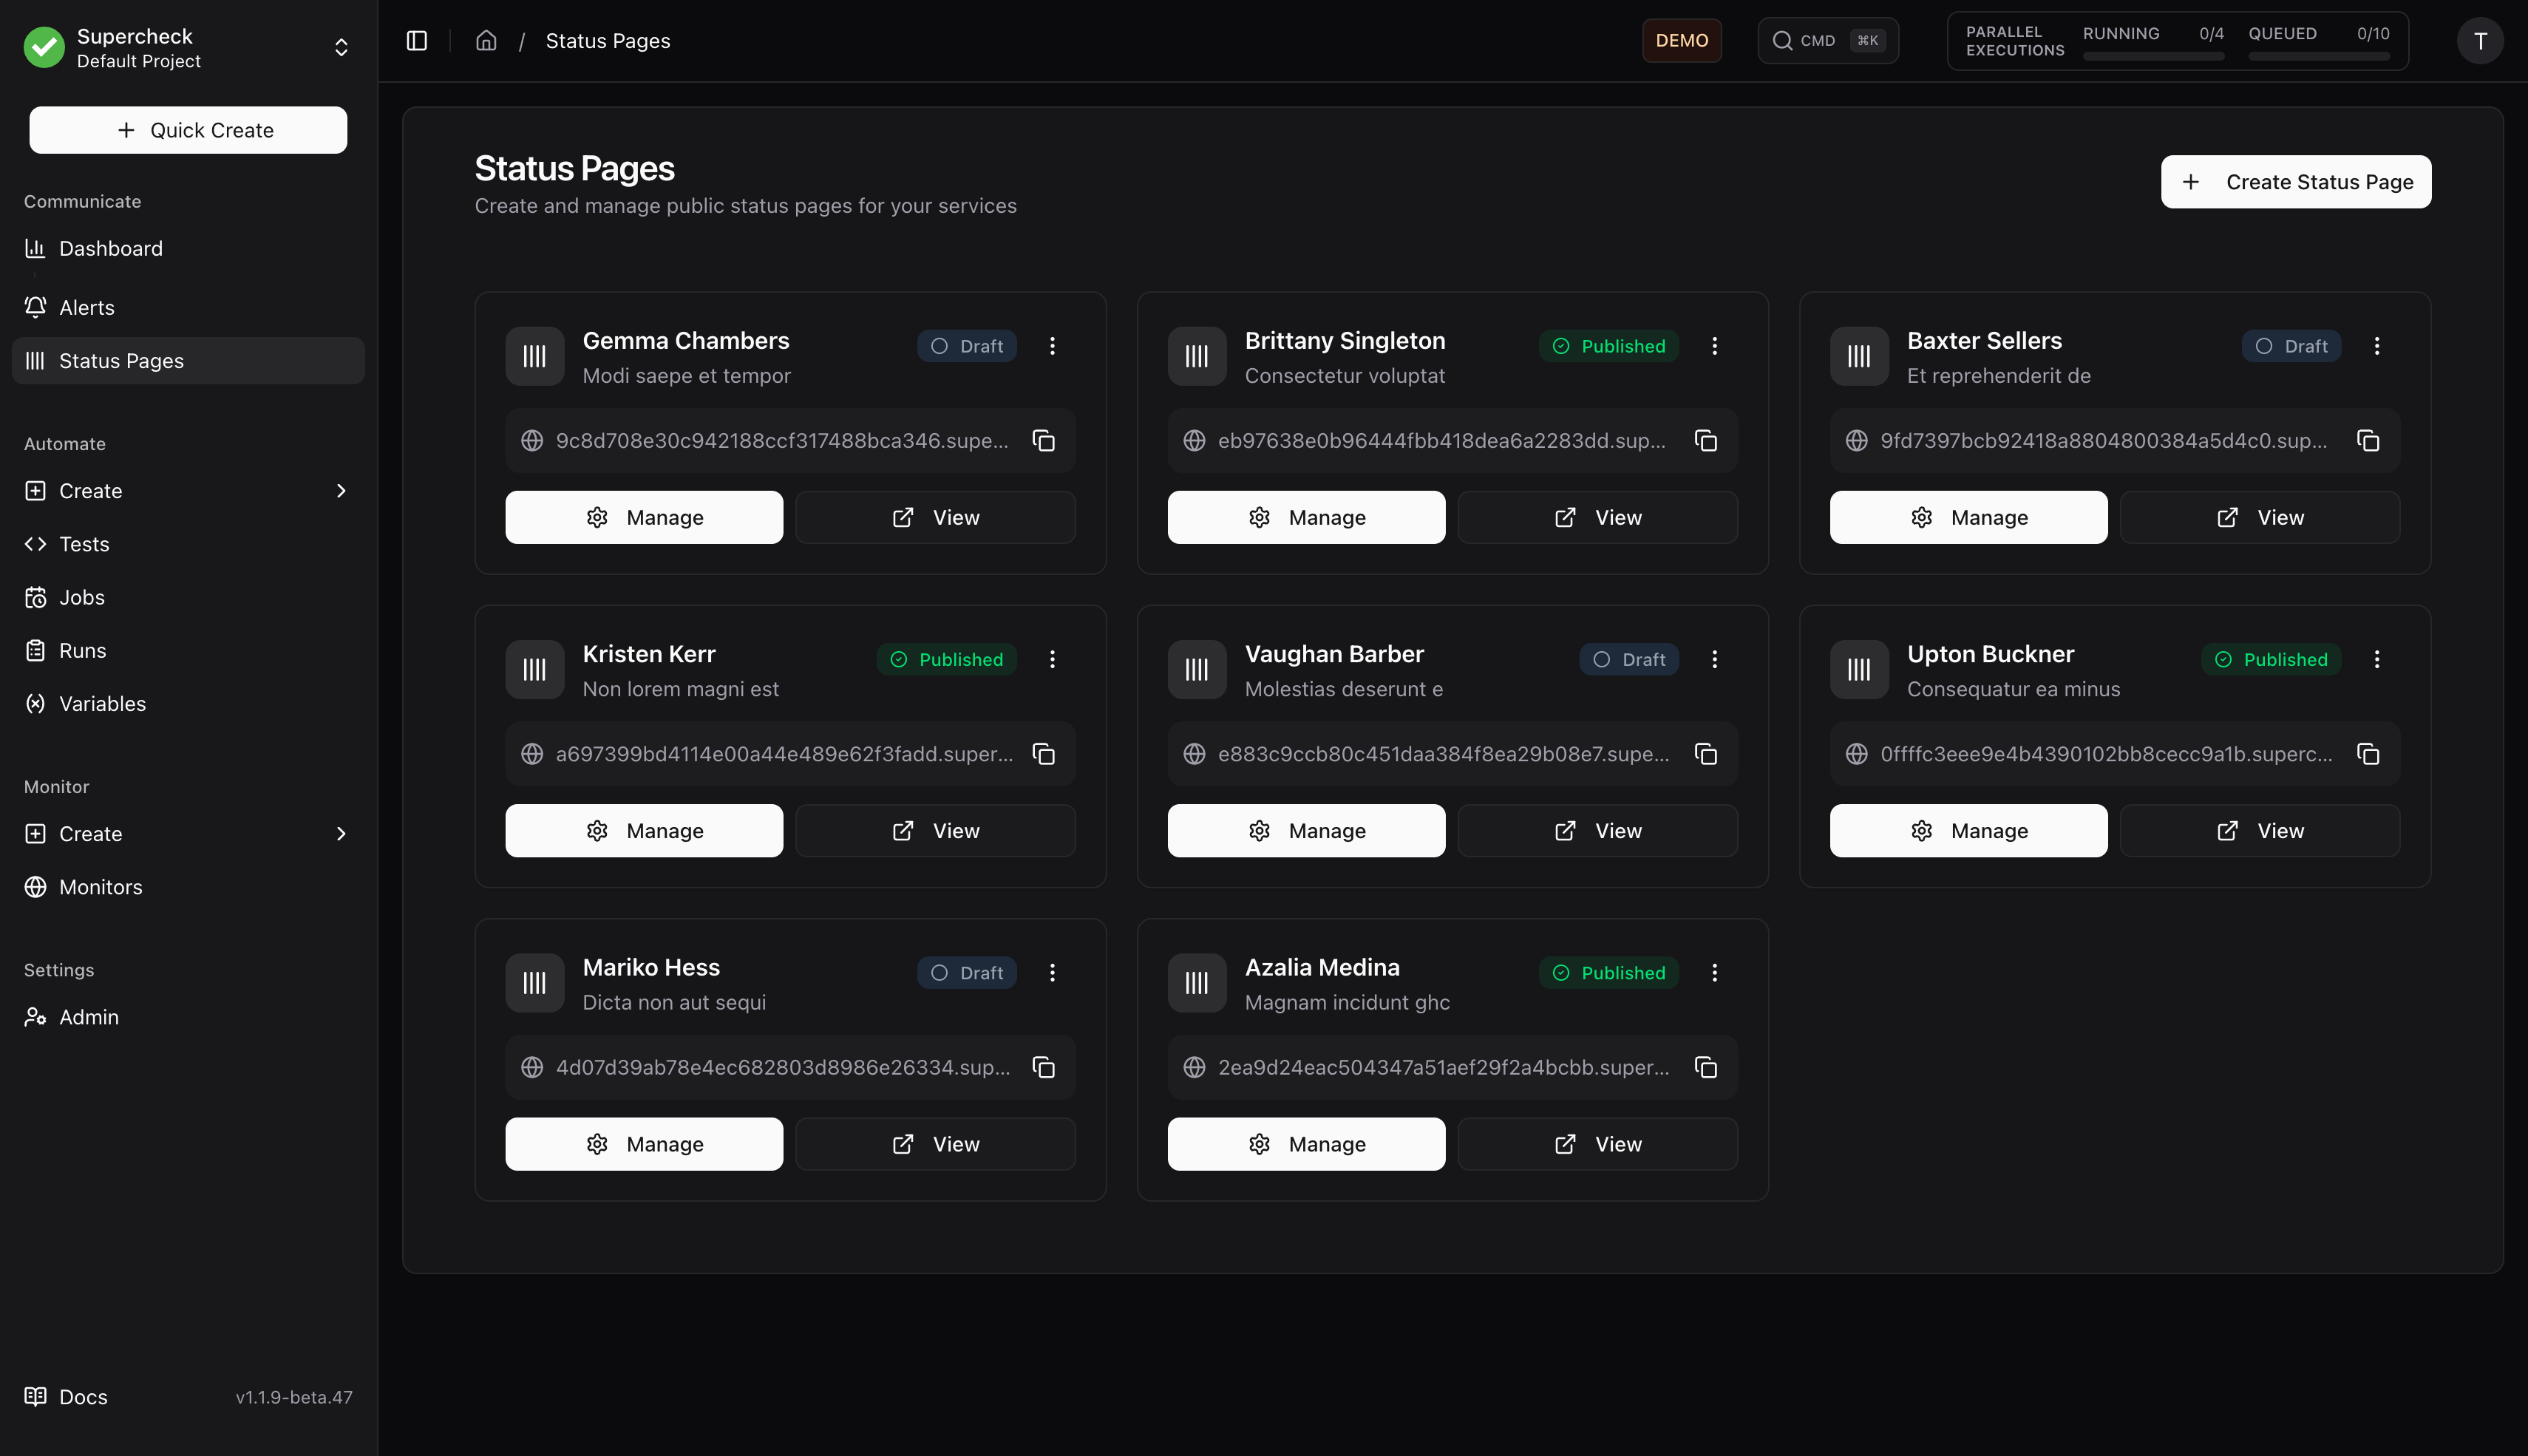
Click Manage to access the management interface:
Creating a Status Page
- Click Create Status Page
- Enter:
- Name — Internal identifier
- Headline — Public title shown on the page
- Description — Brief description for users
- Click Create
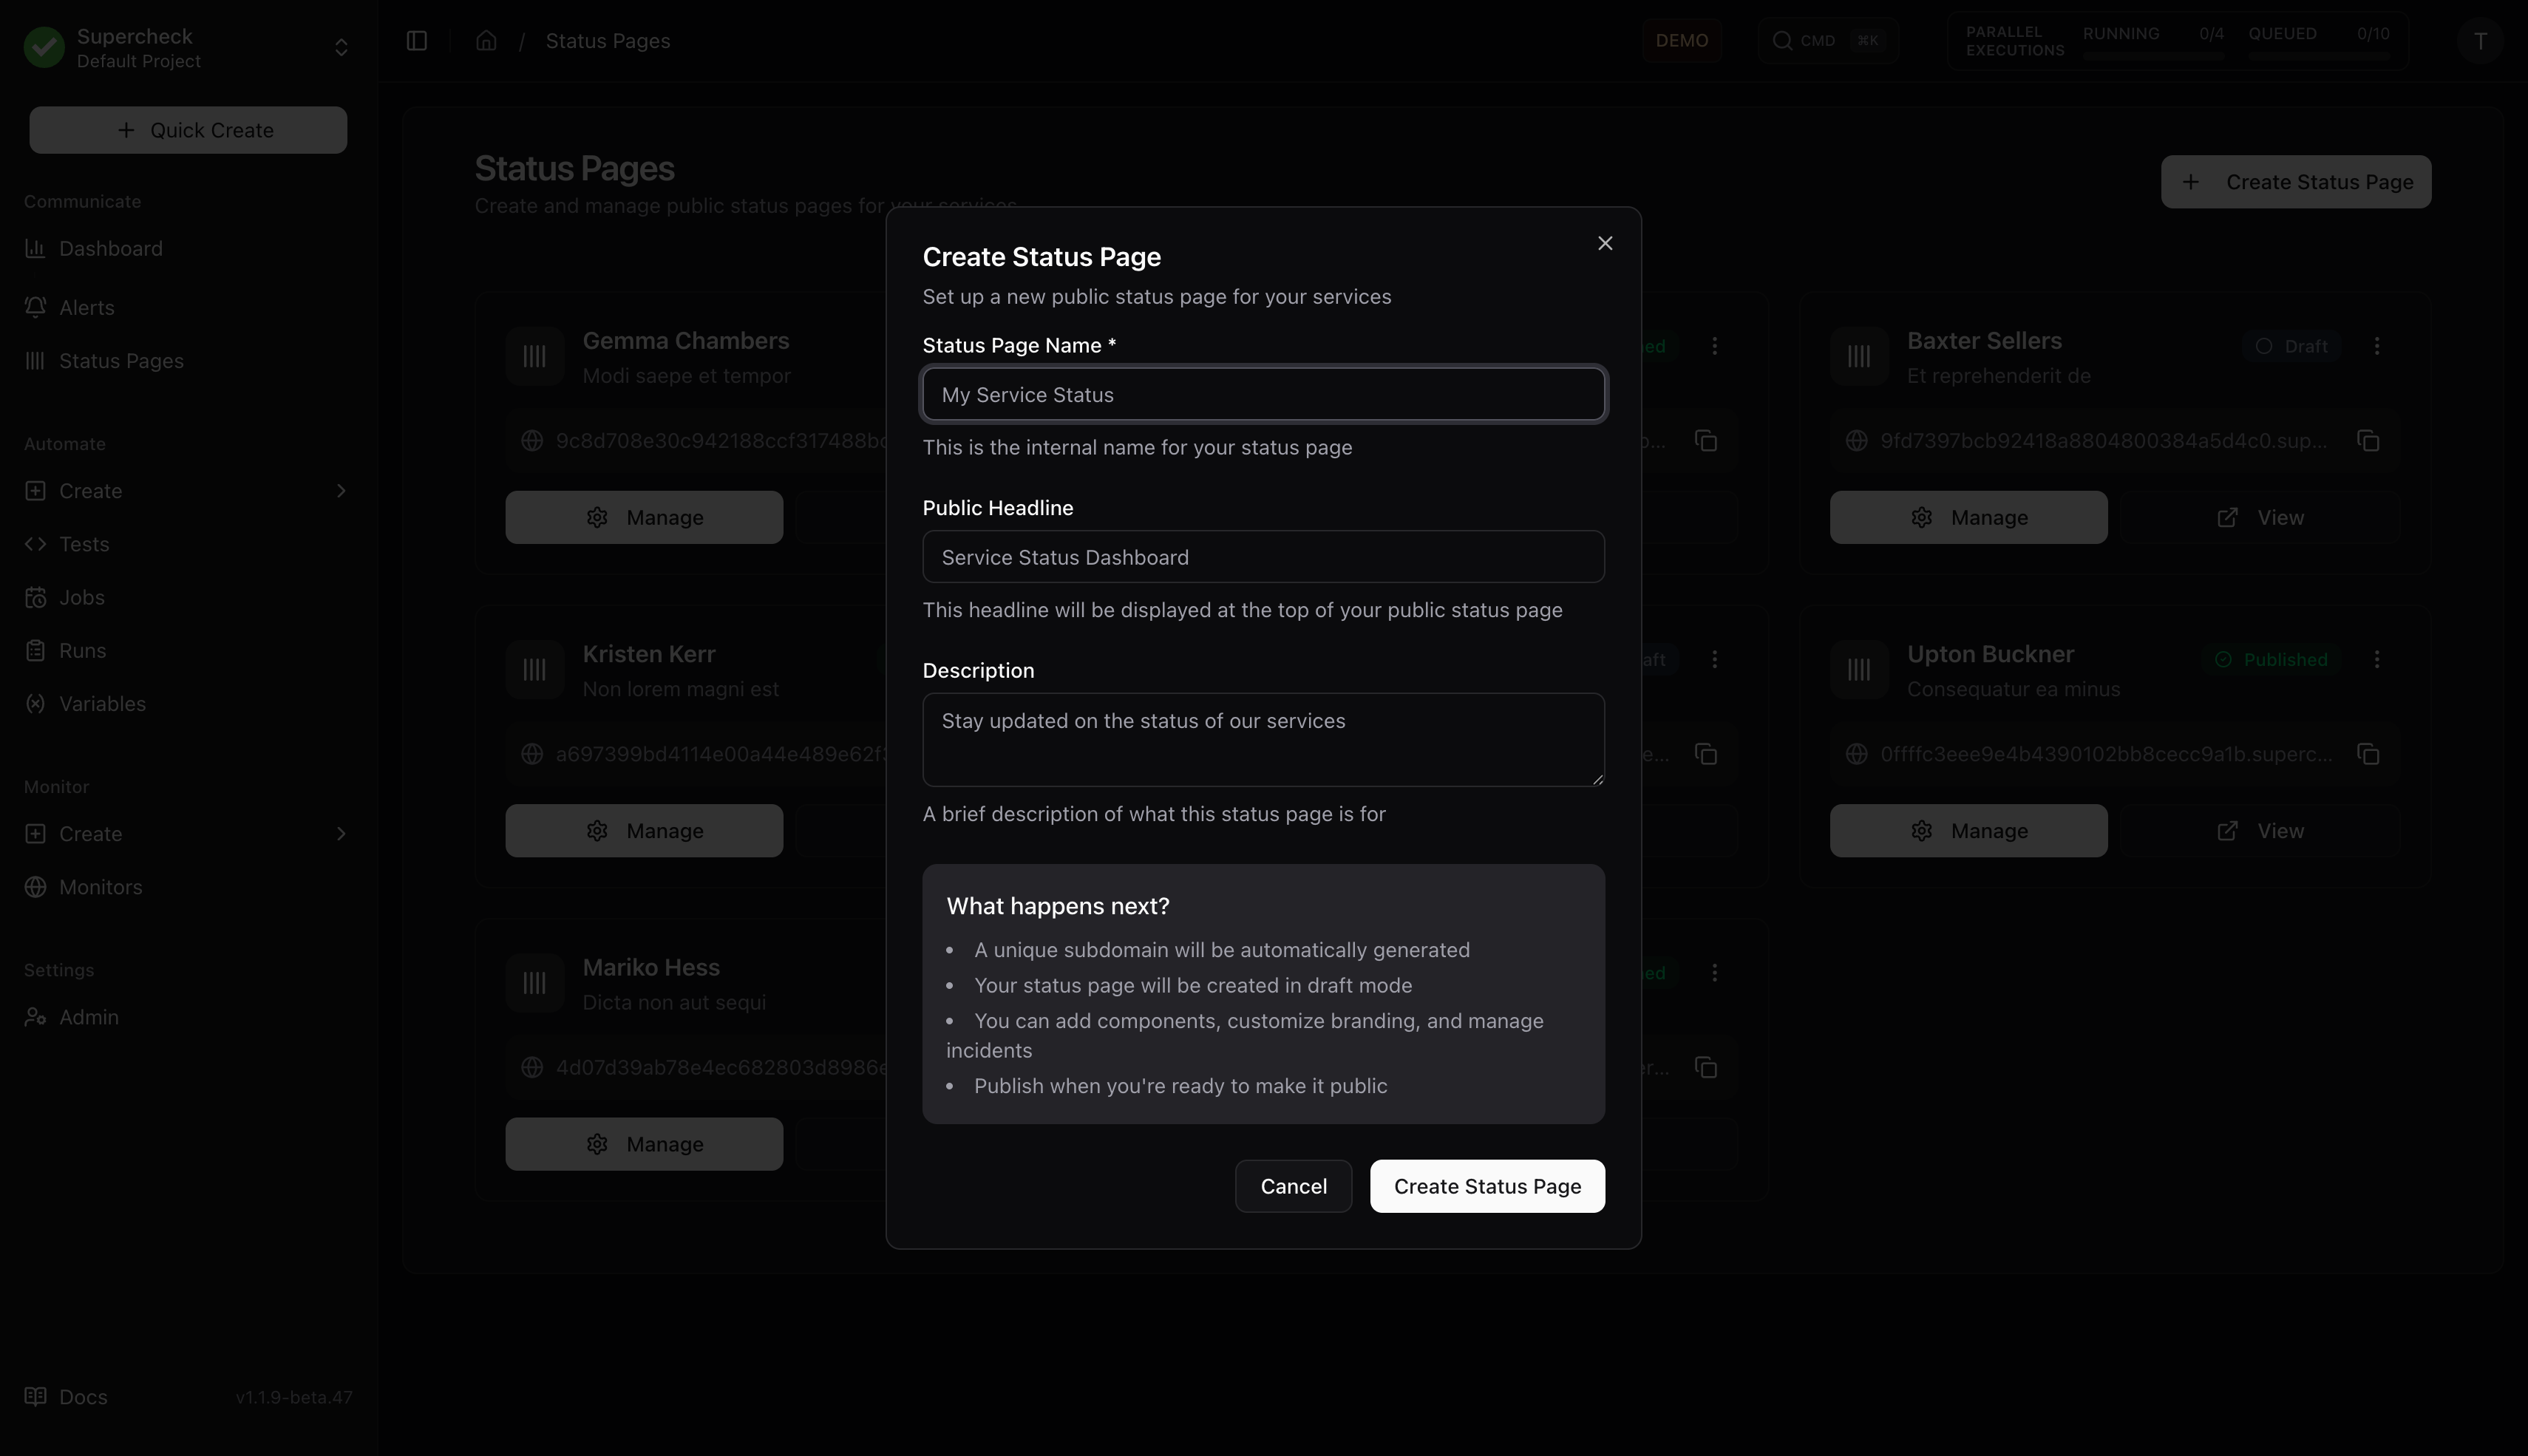
Your page is created in draft mode. Configure components and settings before publishing.
Publishing
- Add at least one component
- Configure branding in Settings
- Click Publish to make the page public
- Share the URL with your users
Components
Components represent individual services or features on your status page.

- Go to Components tab
- Click Add Component
- Enter:
- Name — Service name (e.g., "API", "Website", "Database")
- Description — Brief explanation
- Status — Current operational status
- Linked Monitors — Associate monitors for reference
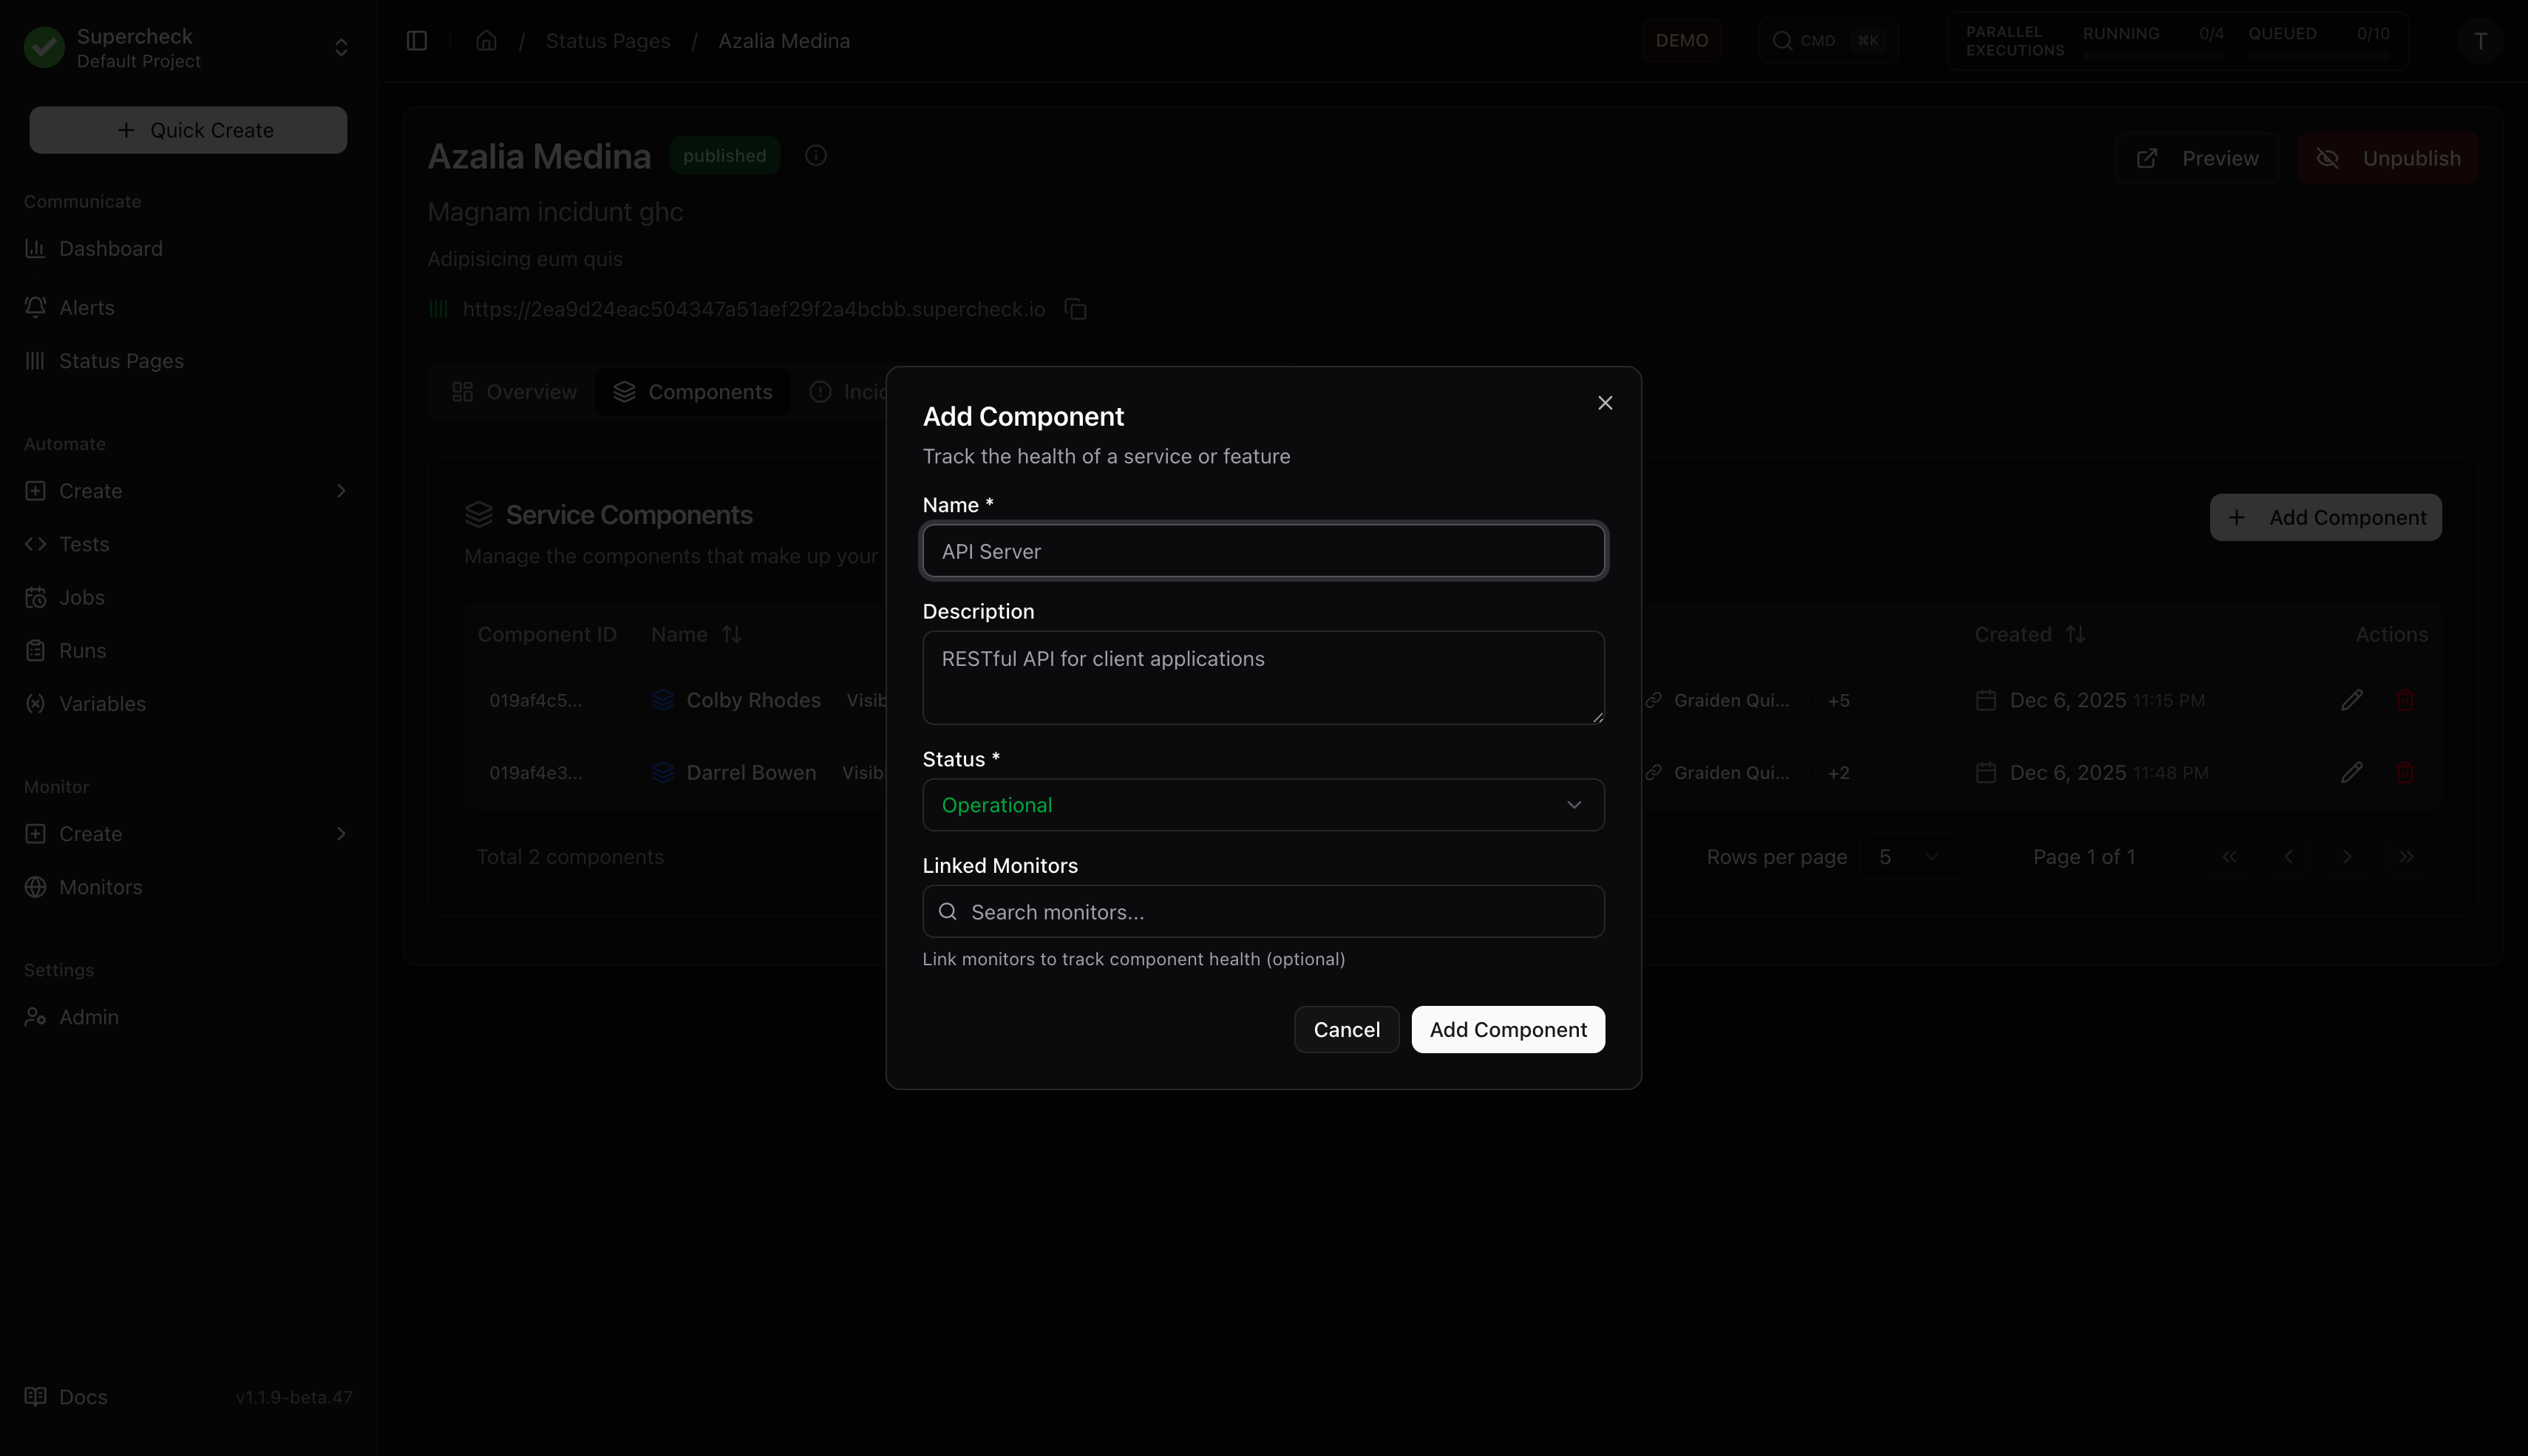
Linked Monitors
Associate monitors with components for reference. Linked monitors appear in the Overview tab and help you track which monitors relate to each service.
Component status is managed manually. Update component status when creating or resolving incidents.
| Status | Color | Description |
|---|---|---|
| Operational | Green | Service functioning normally |
| Degraded Performance | Yellow | Running but slower than normal |
| Partial Outage | Orange | Some features unavailable |
| Major Outage | Red | Service completely down |
| Under Maintenance | Blue | Scheduled maintenance in progress |
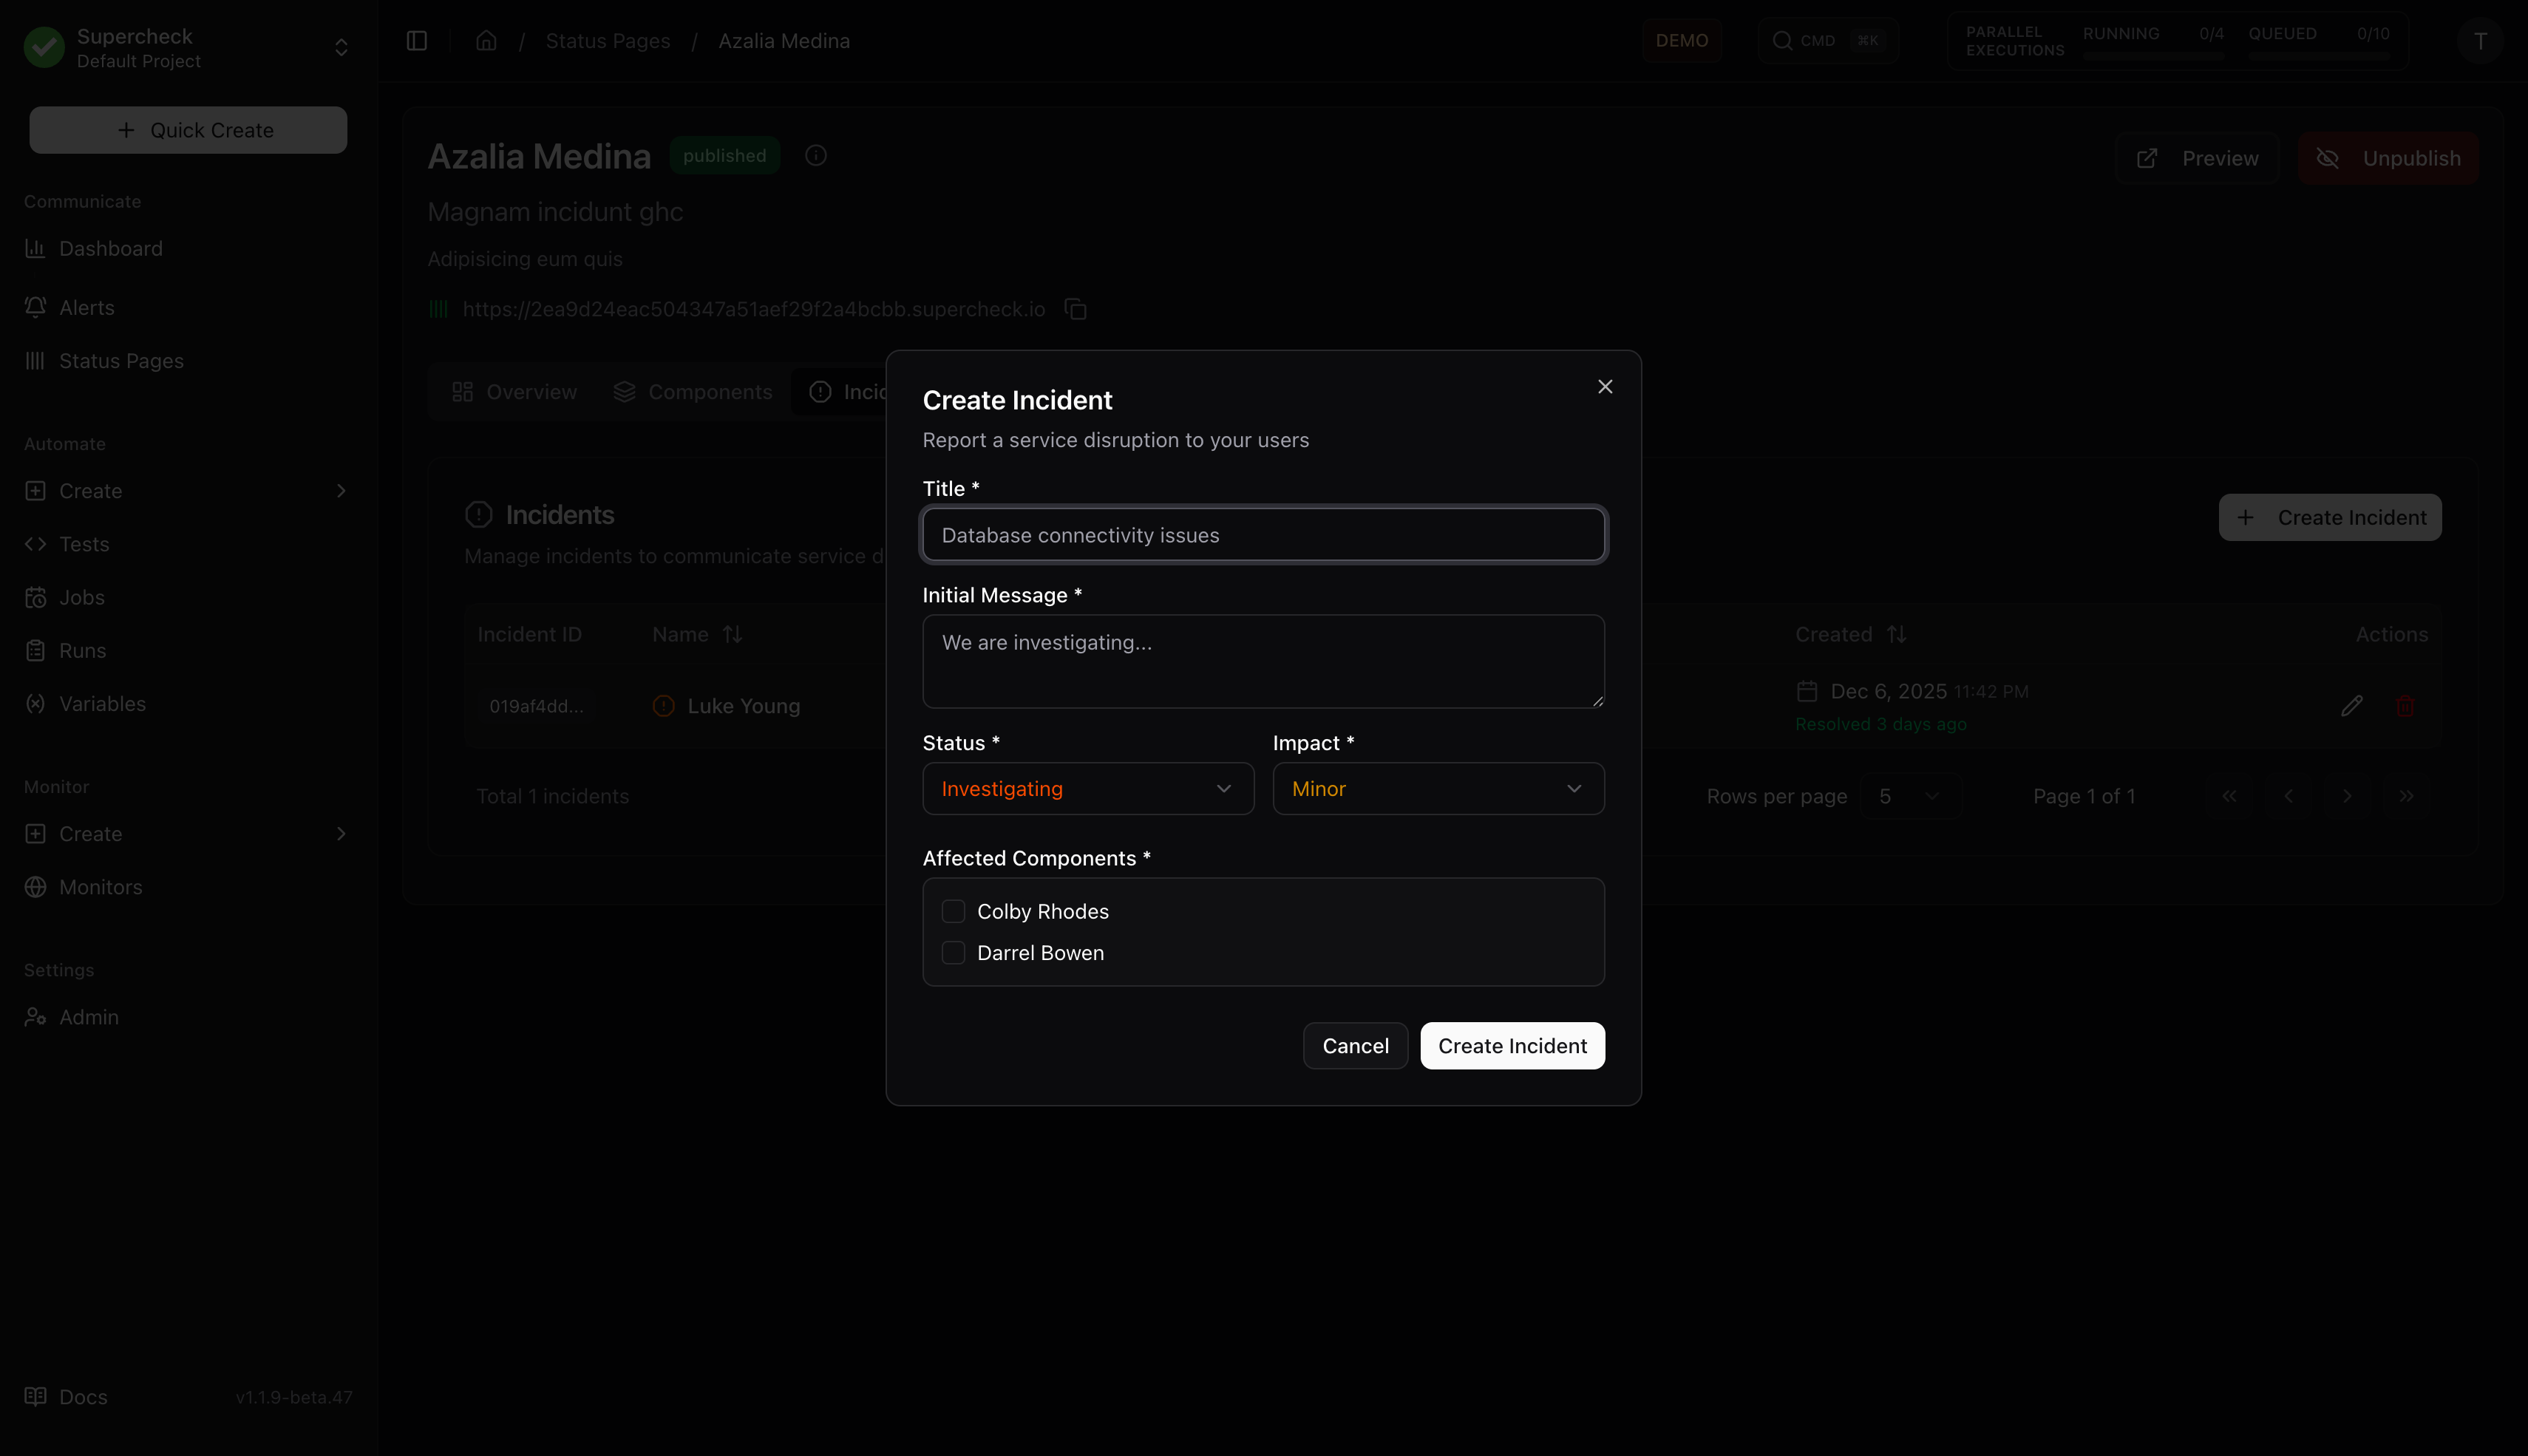
Incidents
Incidents communicate service disruptions to your users.
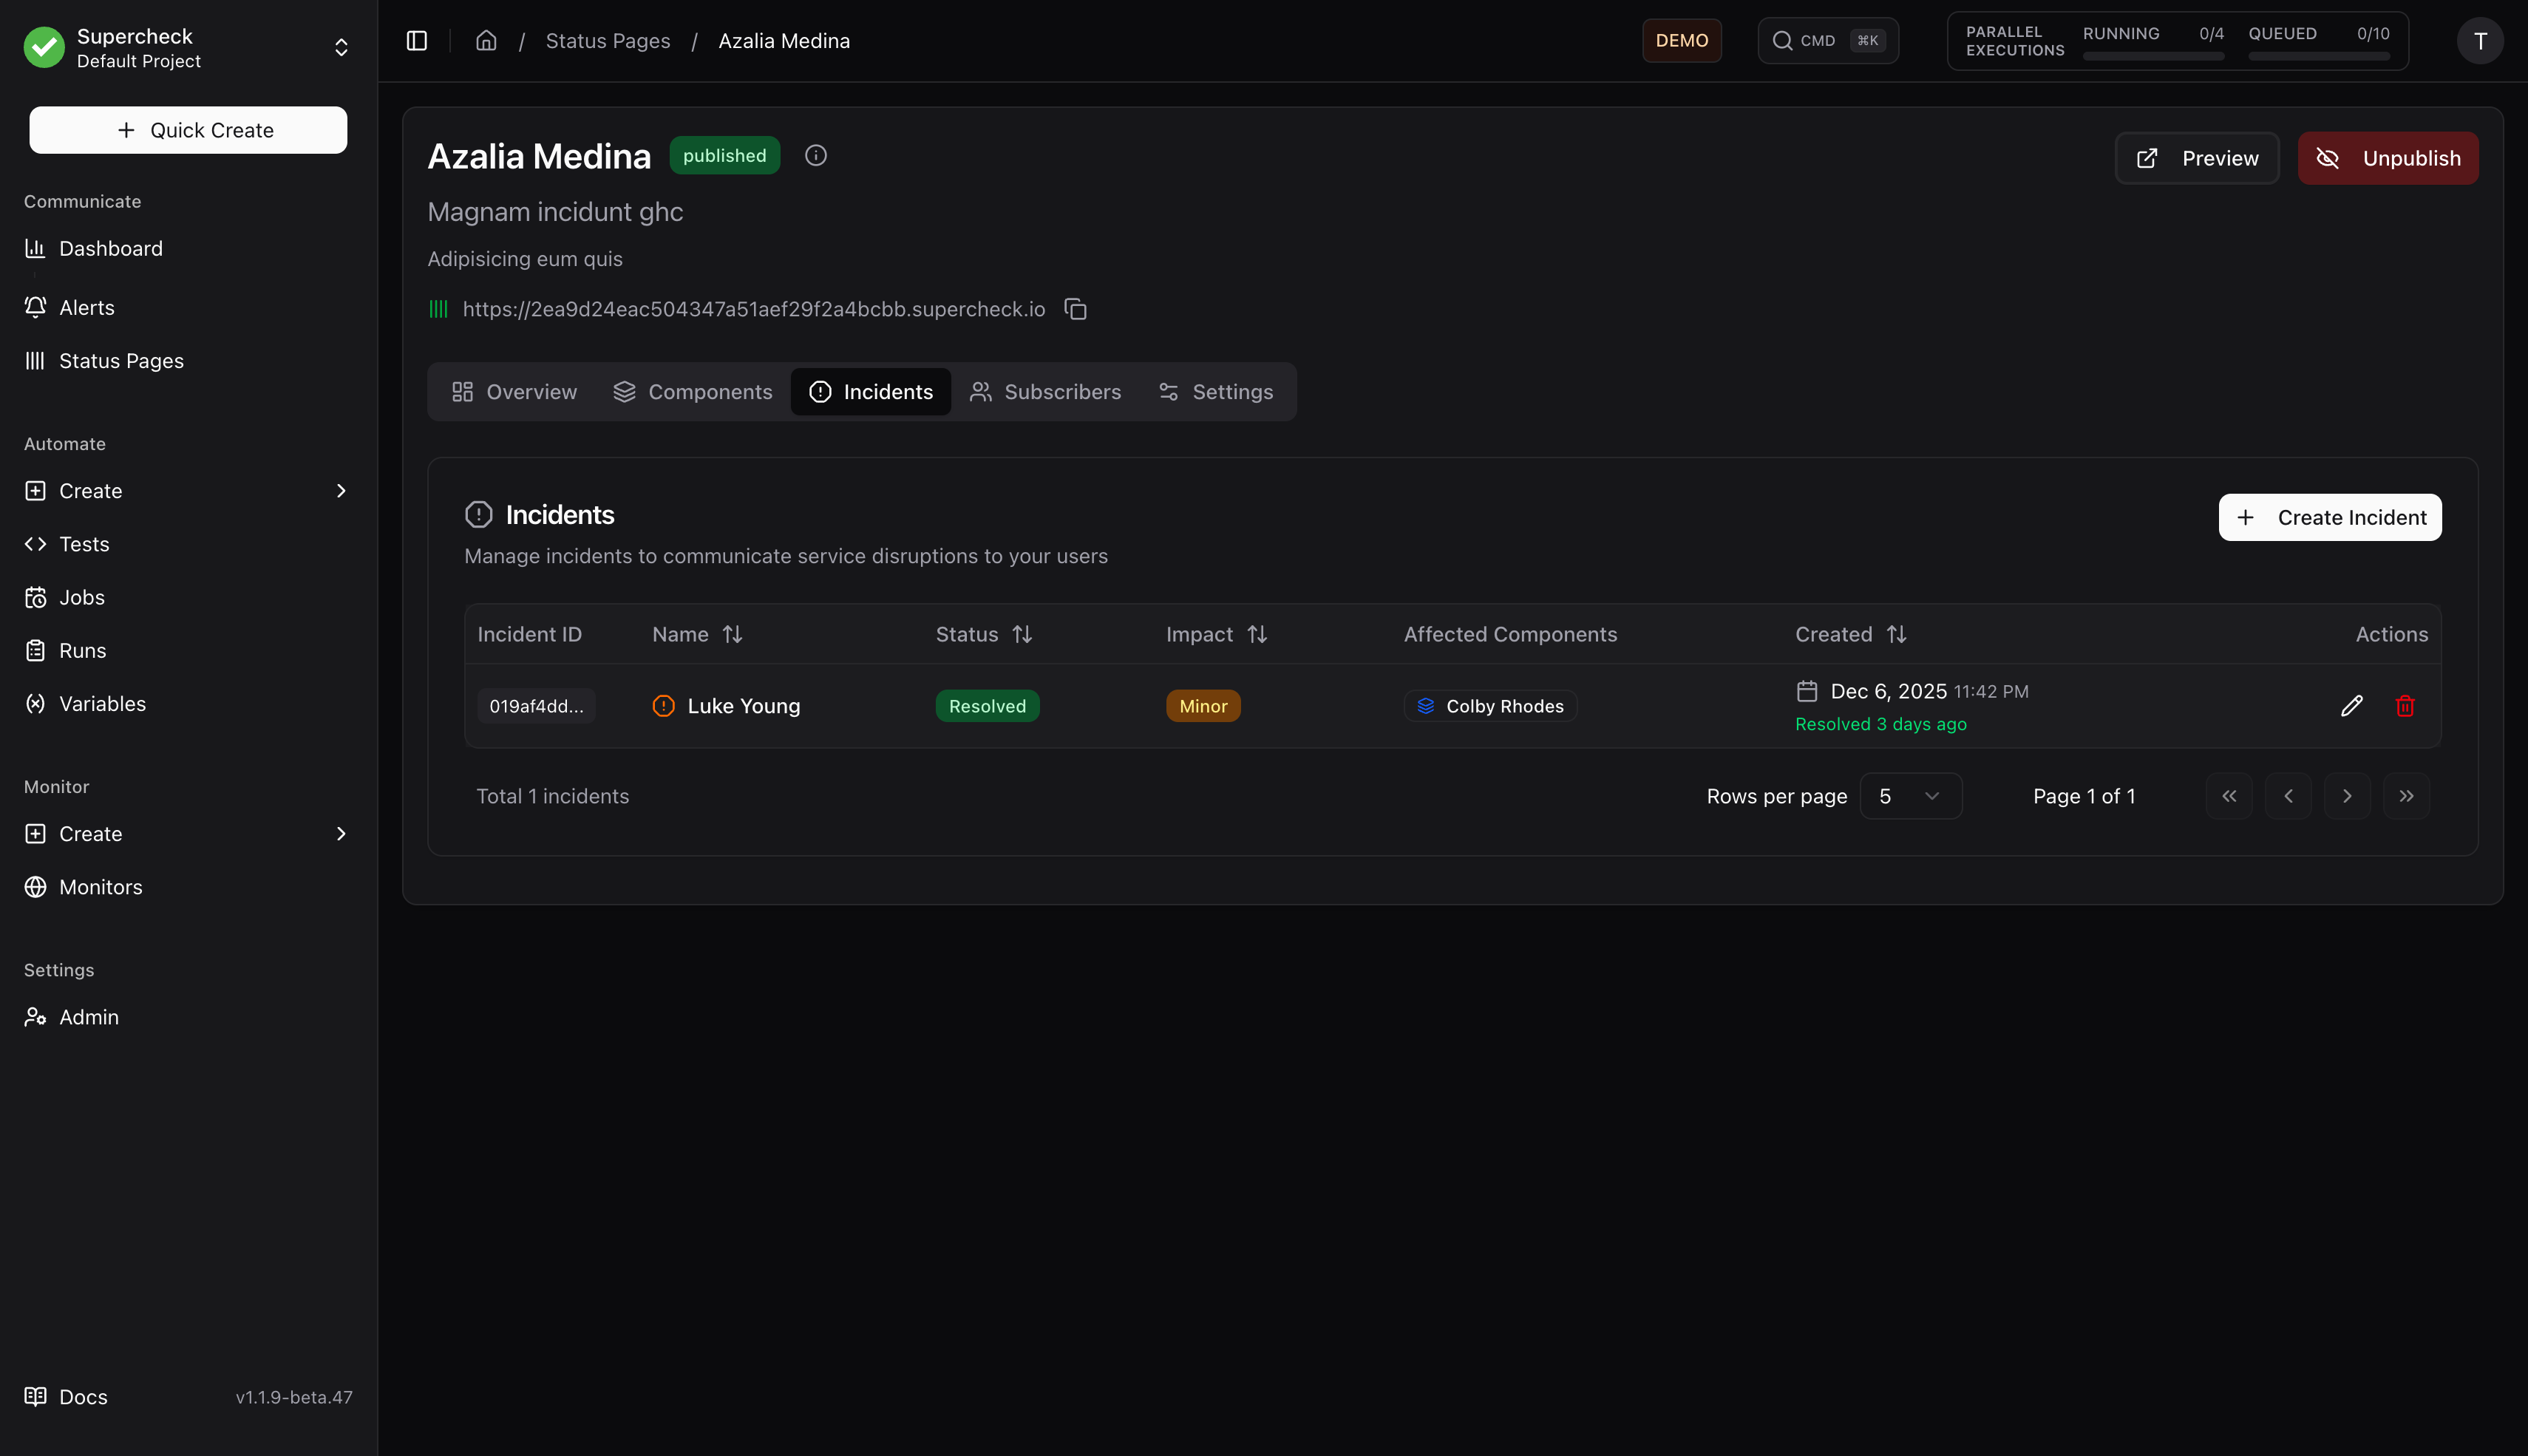
- Go to Incidents tab
- Click Create Incident
- Enter:
- Title — Brief description (e.g., "API Response Delays")
- Message — Initial update for users
- Status — Current investigation status
- Impact — Severity level
- Affected Components — Which services are impacted
- Choose whether to notify subscribers
- Click Create
Incident Updates
- Open an existing incident
- Click Add Update
- Write update message
- Update status if changed
- Choose whether to notify subscribers
Scheduled Maintenance
- Create incident with Scheduled status
- Set start and end times
- Enable automatic status transitions
- Configure reminder notifications
| Status | Description |
|---|---|
| Investigating | Issue detected, team investigating |
| Identified | Root cause found, working on fix |
| Monitoring | Fix deployed, monitoring stability |
| Resolved | Issue completely resolved |
| Scheduled | Planned maintenance |
| Impact | Description |
|---|---|
| None | Informational update |
| Minor | Small subset of users affected |
| Major | Significant impact on service |
| Critical | Complete service outage |
Subscribers
Manage users who receive incident notifications.
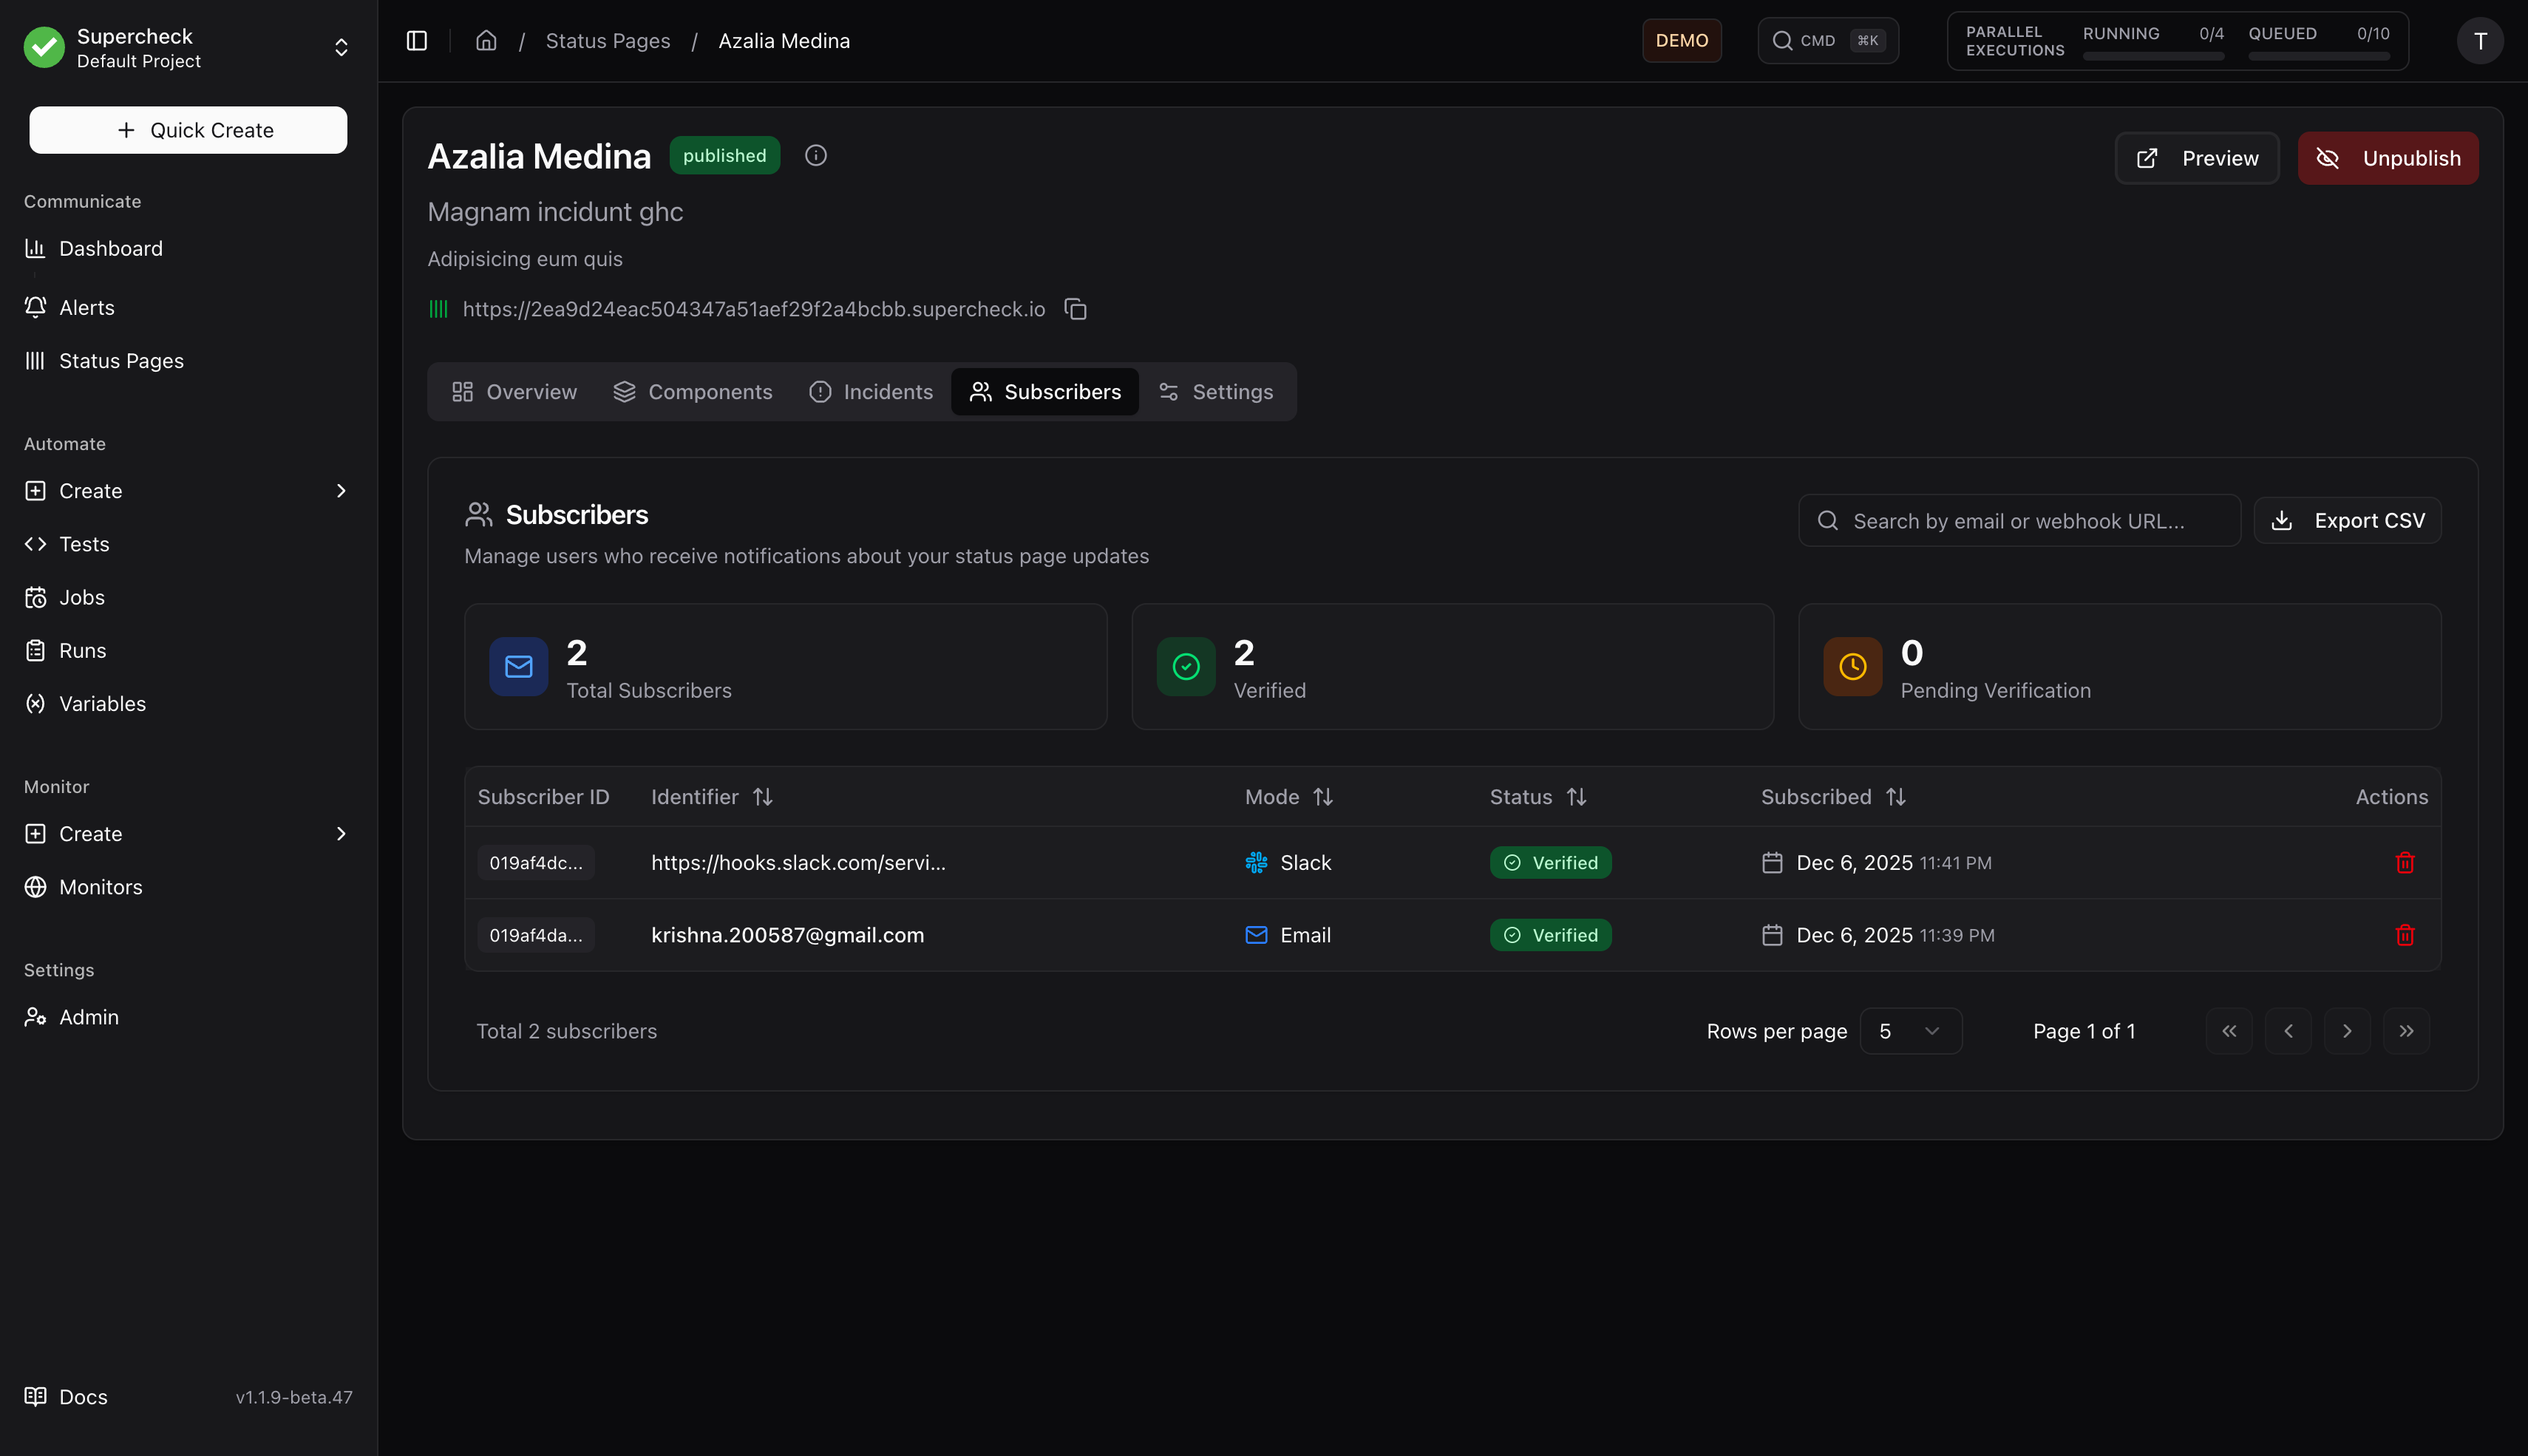
Features:
- View all subscribers (email, webhook, Slack)
- See verification status
- Search and filter by email or URL
- Export to CSV
- Delete subscribers
- View statistics (total, verified, pending)
Notification Types
Subscribers receive notifications for:
- New incidents created
- Incident status updates
- Incident resolution
- Scheduled maintenance reminders
Settings
Configure branding and notification settings.
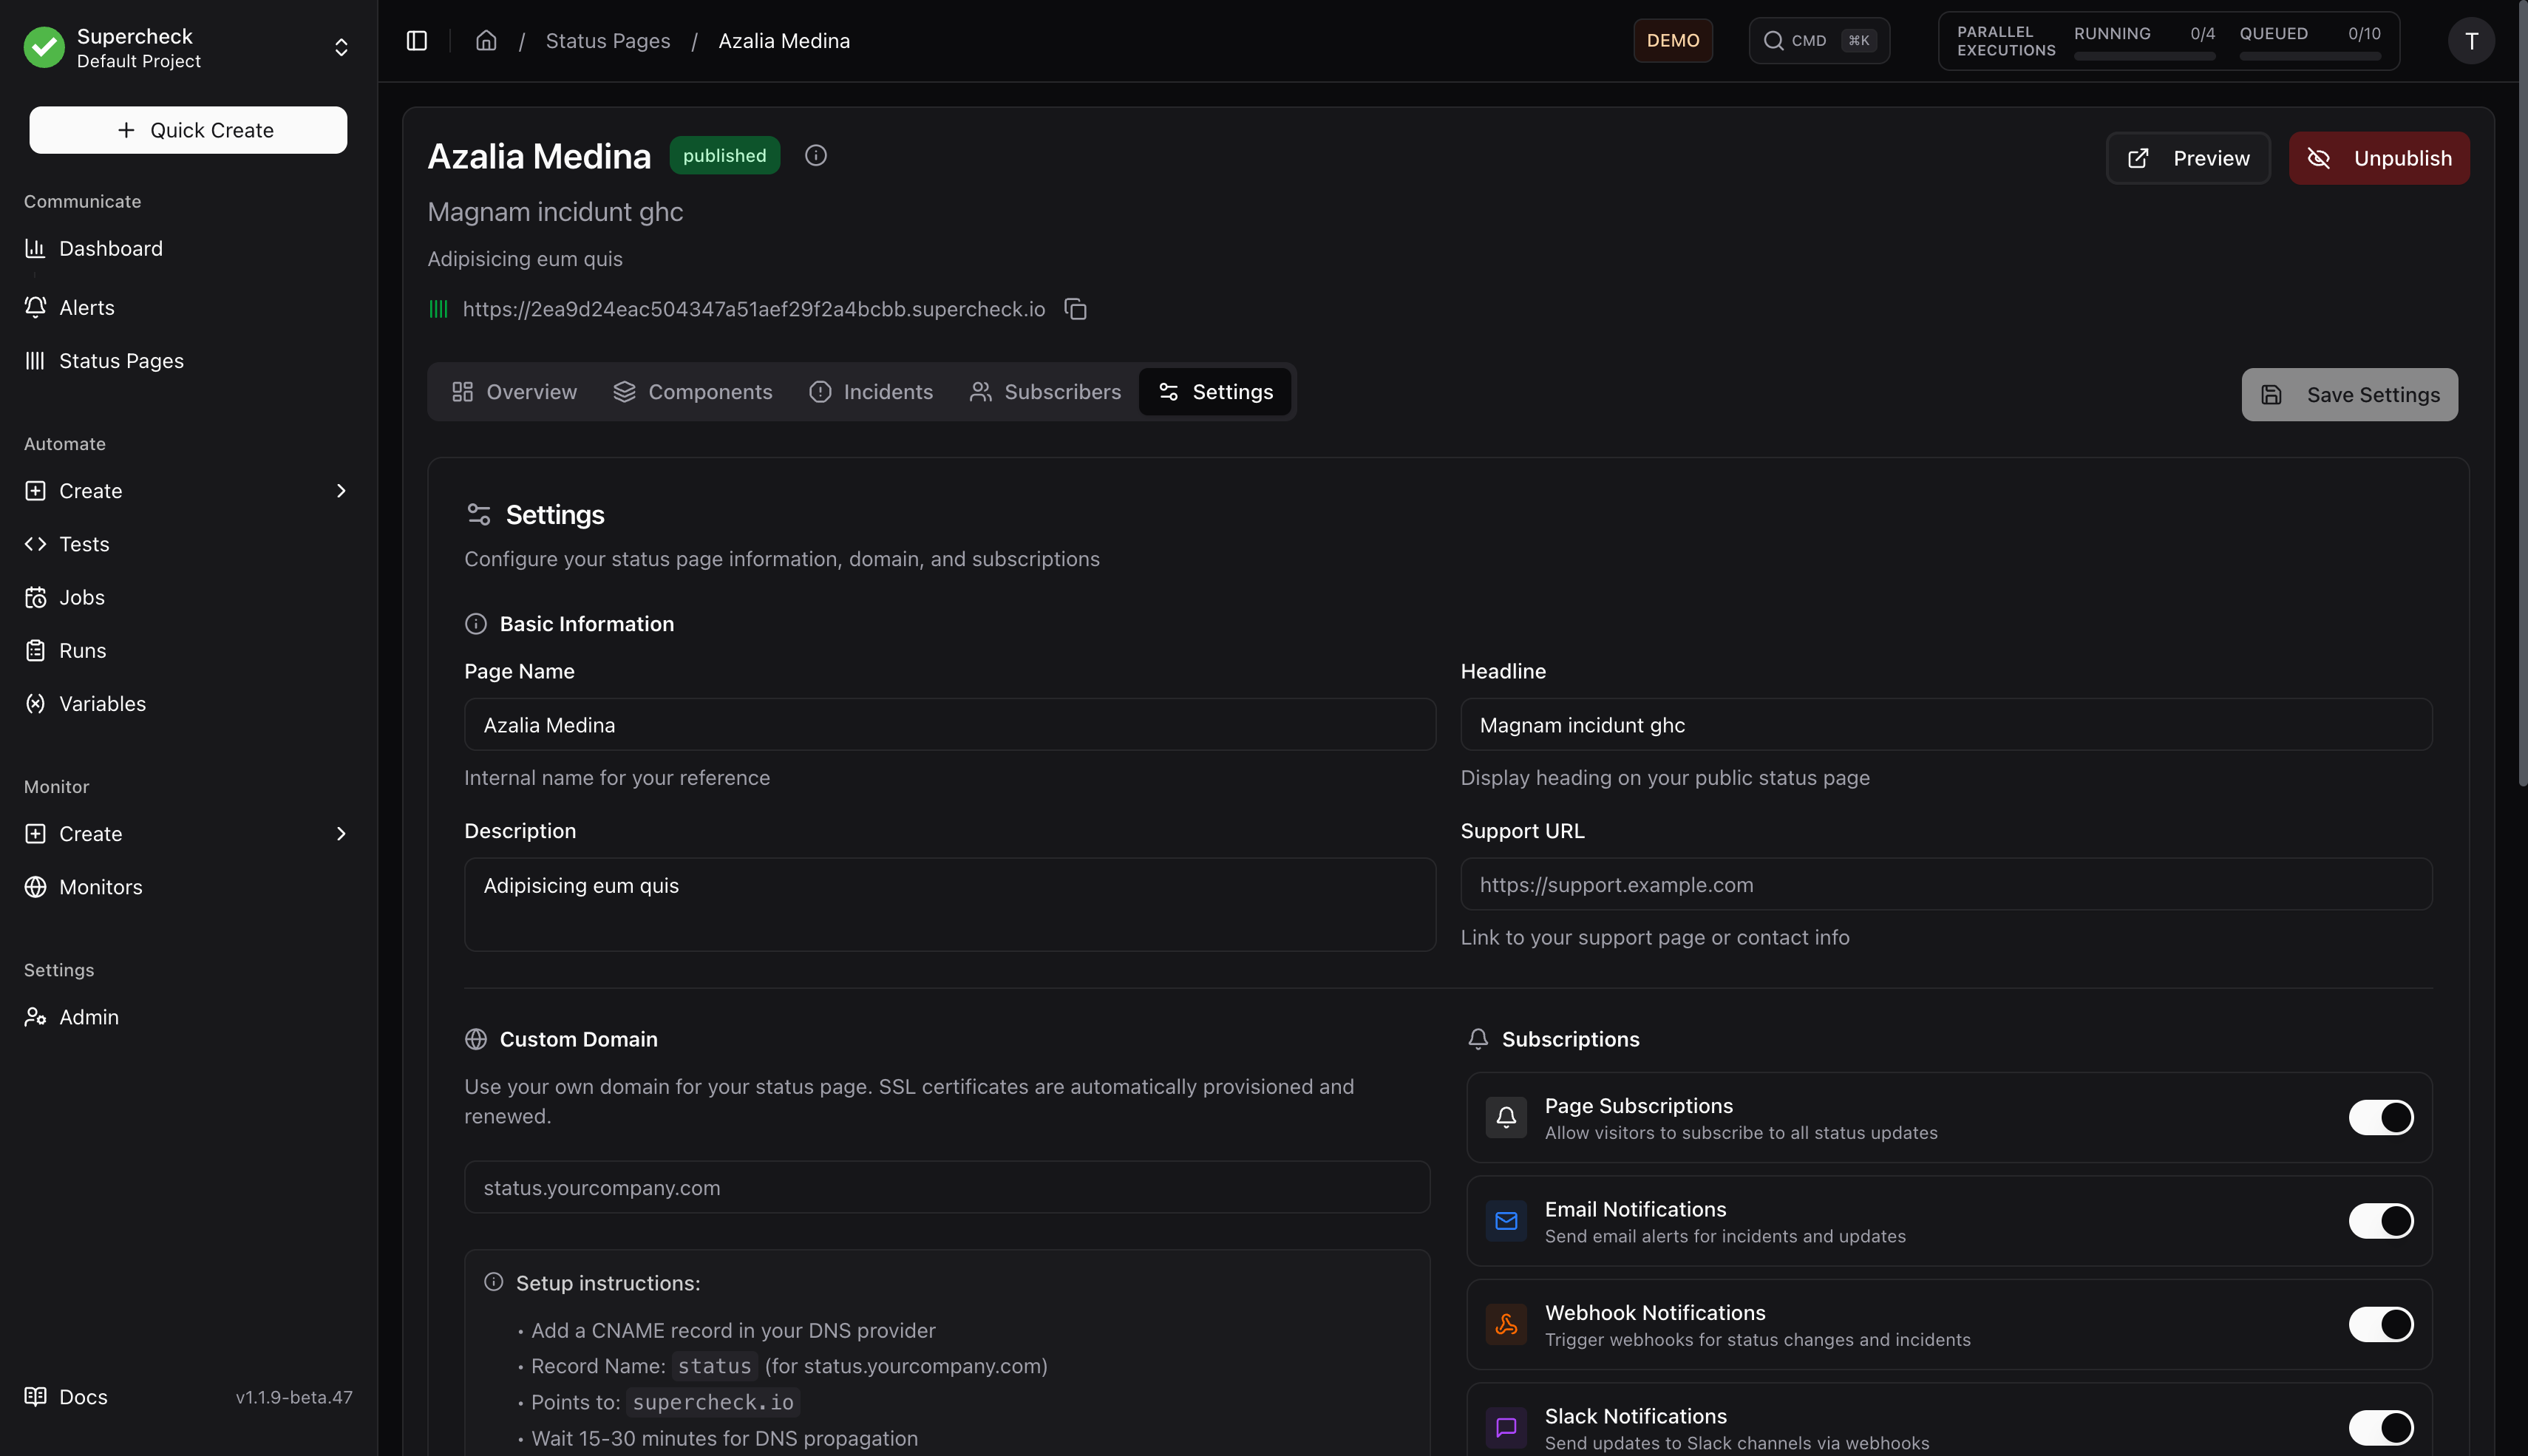
- Logo — Header logo for status page
- Favicon — Browser tab icon
- Status Colors — Customize colors for each status type
- Custom Domain — Use your own domain (e.g.,
status.example.net)
- Subscriber Types — Enable/disable email, webhook, Slack subscriptions
- RSS Feed — Enable RSS feed for subscribers
- Email Footer — Custom text in notification emails
Use your own domain (e.g., status.example.net) instead of the default subdomain.
Local development stays on localhost: When you access Supercheck on http://localhost:3000, the View and Copy URL actions keep using http://localhost:3000/status/[subdomain]. Supercheck does not send local development traffic to the public STATUS_PAGE_DOMAIN.
How Custom Domains Work
Step-by-Step Setup
Configure in Supercheck
- Go to your status page → Settings tab
- Enter your custom domain (e.g.,
status.example.net) - Click Save
Add DNS Record
Log in to your DNS provider (e.g., Cloudflare, GoDaddy, Namecheap) and add the required DNS records.
For example, if your custom domain is status.example.net:
| Type | Hostname | Target |
|---|---|---|
| CNAME | status.example.net | target shown in Settings |
Example self-hosted DNS layout:
- Reserved status-page namespace:
example.com - Target shown in Settings:
cname.example.com - Customer-facing custom domain:
status.example.net
Cloudflare example with separate DNS zones (self-hosted):
| Purpose | Zone | Type | Name | Value | Proxy status |
|---|---|---|---|---|---|
| Target hostname | example.com | A / AAAA | cname | your app / ingress IP | DNS only |
| Custom hostname | example.net | CNAME | status | cname.example.com | DNS only during verification |
Skip the target A / AAAA record if an existing wildcard already covers cname.example.com.
Use the exact target shown in Settings. Some DNS providers expect the full hostname, while others expect only the label relative to your zone.
DNS rules:
- Self-hosted: the target shown in Settings must already point to your app, usually via A/AAAA or wildcard DNS.
- Create a CNAME for the custom hostname to that target.
- Do not add A/AAAA records on the custom hostname itself.
Separate zones are normal: The target hostname shown in Settings and the customer-facing custom hostname can live in different DNS zones. That is common in self-hosted deployments and customer-managed domains.
Reserved domain namespace: Do not set your custom domain to STATUS_PAGE_DOMAIN itself or any of its subdomains. That namespace is reserved for default UUID URLs ([uuid].STATUS_PAGE_DOMAIN). Use a separate hostname and point its CNAME to the target shown in Settings.
Target hostname: The target shown in Settings may resolve through A/AAAA or wildcard DNS records. That is normal and does not change the customer-facing record, which should stay a CNAME.
Cloudflare users: Set the proxy status to DNS only (grey cloud icon) during initial verification and initial HTTPS checks. Only re-enable the proxy after the origin serves the custom hostname correctly.
Verify DNS
- Wait for DNS propagation (typically 5–30 minutes, can take up to 48 hours)
- Return to the Settings tab and click Verify DNS
- Ensure the status page is published
- Once verified and published, your custom domain is active and serving HTTPS traffic
HTTPS / SSL
How HTTPS is handled depends on your deployment:
| Deployment | HTTPS Handling |
|---|---|
| Supercheck Cloud | HTTPS is enabled automatically — no action required |
| Self-hosted (Docker Compose) | The default docker-compose-secure.yml includes a catch-all Traefik route for verified custom domains and forwards those hostnames to the app. Provide TLS certificates for those hostnames separately via Traefik dynamic TLS config, a wildcard/custom certificate, Cloudflare, or another reverse proxy. |
| Behind Cloudflare proxy | Keep the record on DNS only until the origin serves HTTPS correctly for the custom hostname. If you later enable the proxy, use SSL/TLS mode Full or Full (Strict) in your Cloudflare dashboard. |
| Custom / self-managed certificates | Keep the status-custom Traefik router and attach your own TLS configuration for the hostname (for example mounted certificates via a Traefik dynamic config file, or a wildcard/custom certificate). |
| Other reverse proxies (nginx, Caddy) | Configure your reverse proxy to accept traffic for the custom domain and terminate TLS. Forward to the app on port 3000. |
Cloudflare SSL/TLS mode: If using Cloudflare proxy with your custom domain, set the SSL/TLS encryption mode to Full or Full (Strict) in Cloudflare dashboard → SSL/TLS. The Flexible mode can cause redirect loops.
Removing a Custom Domain
To remove a custom domain, clear the domain field in Settings and save. The default subdomain URL will continue to work.
Troubleshooting
| Issue | Solution |
|---|---|
| "CNAME not found" | Wait 15–30 minutes for DNS propagation, then try again |
| "Points to wrong target" | Verify your CNAME target matches the value shown in Settings |
| "Target hostname is not publicly resolvable yet" | Keep your custom hostname as a CNAME only. Make sure the target shown in Settings already points to your app, usually via A/AAAA or wildcard DNS. |
| "Domain already in use" | The domain is configured on another status page — remove it there first |
| 404 on custom domain | Ensure the status page is published, the domain is verified, and the configured custom domain is not STATUS_PAGE_DOMAIN (or one of its subdomains). Also verify the CNAME record points to the exact target shown in Settings. |
| Verification fails with Cloudflare | Cloudflare proxy flattens CNAME records into A/AAAA records, making the CNAME invisible to verification. Temporarily set the record to DNS only (grey cloud), click Verify DNS, then re-enable the proxy. |
| DNS dashboard shows an A/AAAA record too | That is normal for the target hostname shown in Settings. Keep the customer-facing hostname as a CNAME only; do not add both a CNAME and A/AAAA on the same hostname. |
| Redirect loops with Cloudflare | Set Cloudflare SSL/TLS mode to Full or Full (Strict) |
| HTTPS not working (self-hosted) | The default Docker Compose config routes verified custom domains to the app, but you must terminate TLS for those hostnames separately. If behind Cloudflare, ensure SSL mode is Full or Full (Strict). If using Traefik directly, provide matching certificates via dynamic TLS config or a wildcard/custom certificate. |
Self-hosted configuration: Set STATUS_PAGE_DOMAIN to the hostname reserved for default status page URLs ([uuid].STATUS_PAGE_DOMAIN). Supercheck derives the custom-domain target automatically, usually cname.STATUS_PAGE_DOMAIN. That target must already point to your app, usually through A/AAAA or wildcard DNS.
DNS provider input formats vary: Some DNS providers want the full hostname (status.example.net), while others want only the label relative to your zone (status). The required CNAME target stays the same in either format.
Local/self-hosted placeholders are not enough for custom domains: If STATUS_PAGE_DOMAIN still resolves to localhost, 127.0.0.1, or another non-public placeholder, custom domains remain unavailable until you switch STATUS_PAGE_DOMAIN to a publicly reachable hostname. In the Docker Compose templates, setting APP_DOMAIN usually does this automatically.
Test DNS Propagation: Use dnschecker.org to verify your CNAME record has propagated globally before clicking Verify DNS.